DepthAI Demo
DepthAI demo is a GUI application that was designed to quickly test some camera features. It is located at luxonis/depthai repository on Github.
Using other models
We have prepared other models, which you can try and evaluate with ease.
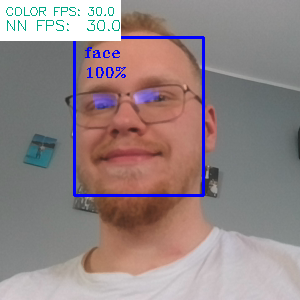
To run the demo script with e.g. face-detection-retail-0004, click on the CNN Model combo box and select mentioned model
Which will allow you to detect human faces, like below
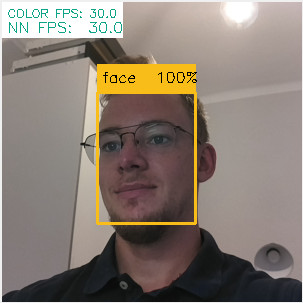
You can use this combo box to change the model that is being run on the DepthAI. It’s also possible to use command line to select
$ python3 depthai_demo.py -cnn face-detection-retail-0004
Below, there is a list of models that you can use, having just the demo script downloaded
Name |
Purpose |
FPS |
Links |
|---|---|---|---|
|
People segmentation |
22.1 |
|
|
Face detection |
13.4 |
|
|
Face detection |
30.0 |
|
|
Object detection (20 classes) |
30.0 |
|
|
People detection |
13.1 |
|
|
People detection |
10.7 |
|
|
People, vehicle and bike detection |
6.2 |
|
|
Object detection (80 classes) |
1.9 |
|
|
Object detection (80 classes) |
29.9 |
|
|
Vehicle detection |
14.0 |
|
|
License plate detection |
30.0 |
|
|
Pose estimation (openpose) |
6.5 |
|
|
Pose estimation (intel) |
7.3 |
deeplabv3p_person- Allows to highlight parts of the image where a person is detected$ python3 depthai_demo.py -cnn deeplabv3p_person

face-detection-adas-0001- Allows to detect faces on the image (slower)$ python3 depthai_demo.py -cnn face-detection-adas-0001
face-detection-retail-0004- Allows to detect faces on the image (faster)$ python3 depthai_demo.py -cnn face-detection-retail-0004
mobilenet-ssd- Object detector that detects 20 different classes (default)$ python3 depthai_demo.py -cnn mobilenet-ssd
pedestrian-detection-adas-0002- allows to detect people on the image (slower)$ python3 depthai_demo.py -cnn pedestrian-detection-adas-0002

person-detection-retail-0013- allows to detect people on the image (faster)$ python3 depthai_demo.py -cnn person-detection-retail-0013

person-vehicle-bike-detection-crossroad-1016- allows to detect both people, bikes and vehicles on the image$ python3 depthai_demo.py -cnn person-vehicle-bike-detection-crossroad-1016

yolo-v3- Object detector that detects 80 different classes (slower)$ python3 depthai_demo.py -cnn yolo-v3
tiny-yolo-v3- Object detector that detects 80 different classes (faster)$ python3 depthai_demo.py -cnn tiny-yolo-v3
vehicle-detection-adas-0002- allows to detect vehicles on the image$ python3 depthai_demo.py -cnn vehicle-detection-adas-0002

vehicle-license-plate-detection-barrier-0106- allows to detect both vehicle and license plate on the image (only Chinese license plates)$ python3 depthai_demo.py -cnn vehicle-license-plate-detection-barrier-0106

openpose2- Human pose estimation model$ python3 depthai_demo.py -cnn openpose2

human-pose-estimation-0001- Human pose estimation model from Open Model Zoo$ python3 depthai_demo.py -cnn human-pose-estimation-0001

All of the data we use to download and compile a model can be found here.
Demo usage
In this section, we’ll go through the config options available in the demo script, allowing you to try out different configurations

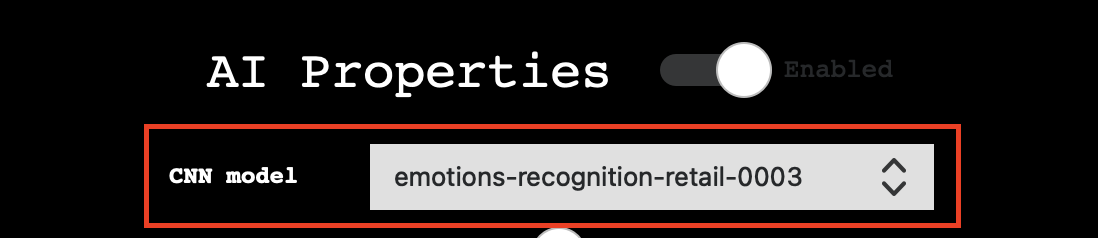
AI Properties

Switches:
Enabled: Turns AI on/off. Turning it off will prevent any neural network from being run, which will also save some of the memory. Useful for situations where we’re more focused on Depth/Encoding rather than AI processing
Basic properties:
CNN Model: Choose which model to run on DepthAI, see more at Using other models
SHAVEs: Determines the number of SHAVE cores used to compile the neural network. The higher the value, the faster network can run, but this also limits features that can be enabled at once.
Model source: Specify which camera preview will be taken as model input, so which frames will be sent to a neural network to perform inference
Full FOV: If enabled, it will scale down the camera image to meet the nn input size. If disabled, before scaling, it will crop the image to meet the NN aspect ratio
Advanced:
OpenVINO version: Specify the OpenVINO version that will be used to compile the MyriadX blob and run the pipeline. It’s recommended to use the latest version for most cases
Label to count: Allows to display a count of a specific label visible in the demo (e.g. if you want to count the number of cats in the preview with the default model, you can do so by selecting
catas a count label and restarting the script)Spatial bounding box: When enabled, will draw a bounding box on depth previews that show which part of the detection area was taken into depth estimation.
SBB Scale Factor: Determines the size of the spatial bounding box in comparison to the detection bounding box.
Depth Properties

Switches:
Enabled: Turns Depth on/off. Turning it off will prevent the stereo node from being created, which will also save some of the memory. Useful for situations where we’re more focused on AI processing/Encoding rather than depth.
Use Disparity: If not set (default), the demo script will calculate the disparity map on host, based on the depth map. If enabled, the same processing will be performed on the device, consuming some of the memory but limiting host resource usage.
Basic properties:
Median Filtering: Specifies the type of noise removing median filter applied to the depth map
Subpixel: Enables subpixel mode, which improves the depth precision and is especially useful for long-range measurements
Left Right Check: Enables left-right check, that is used to remove incorrectly calculated disparity pixels due to occlusions at object borders
Extended Disparity: Enables extended disparity mode, that allows a closer minimum distance for the given baseline
Depth Range: Specifies the minimum and maximum distance calculated by the device
LRC Threshold: Specifies the max difference between disparity pixels that will make the pixel invalidated (the higher threshold, the more points will get through)
Camera Properties

Basic properties:
FPS: Specifies how fast should the camera capture the frames
Resolution: Specifies camera sensor resolution and thus captured frame size
Advanced:
ISO: Controls the light gathering ability of the camera
Exposure: Controls the exposure time of the camera
Saturation: Controls the intensity of colors in a frame
Contrast: Controls the visual ratio of different tones in a frame
Brightness: Controls how dark or light the colors are in a frame
Sharpness: Controls the clarity of details in a frame
Misc

Recording:
Switches: enable recording of specified camera
FPS inputs: specifies recording FPS (default 30)
Destination: specifies a directory path where the recordings will be stored
Reporting:
Switches: enable logging of the specified feature
Destination: specifies a file path where the report file will be stored
Using custom models
Let’s assume you want to run a custom model which you downloaded from the model zoo or trained yourself (or both). To prepare your model to be runnable on DepthAI, it has to be compiled into MyriadX blob format - which is an optimized version of your model, capable of utilizing MyriadX chip as a processing unit.
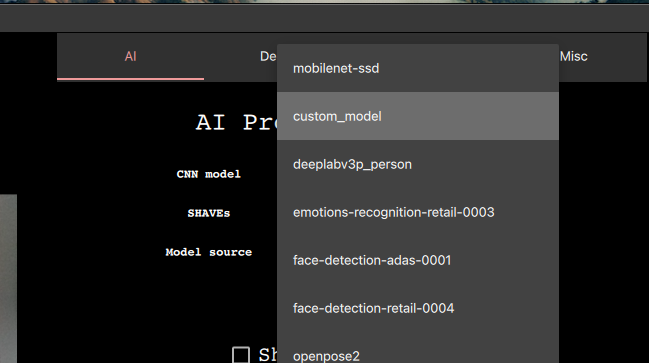
In our demo script, we support a few ways you can run your custom blob, which will be covered below. As an example,
I’ll add a custom face detection network called custom_model (substitute with your preferred name)
and run it with the demo script
Compile MyriadX blob
To receive a MyriadX blob, the network has to be already in OpenVINO IR format (consisting of .xml and .bin
files) that will be used for compilation. We won’t focus here on how to obtain this representation for your model, but be sure
to check official OpenVINO conversion guide.
To convert custom_model.xml and custom_model.bin, we’ll use the blobconverter cli - our
tool that utilizes Online MyriadX blob converter to perform the conversion.
No local OpenVINO installation is needed in this case, as all of the dependencies are already installed on the server.
If your model is in TensorFlow or Caffe format, you can still use our tool for conversion, just note that
you’ll have to use different input flags and sometimes provide a custom model optimizer args (Read more)
First, let’s install blobconverter from PyPi
$ python3 -m pip install -U blobconverter
Now, having the blobconverter installed, we can compile our IR files with the following command
$ python3 -m blobconverter --openvino-xml /path/to/custom_model.xml --openvino-bin /path/to/custom_model.bin
By running this command, blobconverter sends a request to the BlobConverter API to perform
a model compilation on provided files. After compilation, the API responds with a .blob file and
deletes all source files that were sent with the request.
After a successful compilation, blobconverter returns the path to the downloaded blob file.
Since this blob is required by the depthai repository, let’s move it there
$ mkdir <depthai_repo>/resources/nn/custom_model
$ mv <path_to_blob> <depthai_repo>/resources/nn/custom_model
Configuration
We need to provide some additional configuration for the demo script to run this blob.
The demo script will look for a custom_model.json for details on how to configure the pipeline and parse the results.
If your model is based on MobileNetSSD or Yolo, you can use our detection output format.
If it’s a different type of network, you can use raw (default) output format and provide a custom handler file
to decode and display the NN results.
You can use these configuration examples to customize your custom_model.json inside resources/nn/custom_model directory
MobileNetSSD (we will use this config)
{
    "nn_config":
    {
        "output_format" : "detection",
        "NN_family" : "mobilenet",
        "confidence_threshold" : 0.5,
        "input_size": "300x300"
    },
    "mappings":
    {
        "labels":
        [
            "unknown",
            "face"
        ]
    }
}
Yolo
{
    "nn_config":
    {
        "output_format" : "detection",
        "NN_family" : "YOLO",
        "input_size": "416x416",
        "NN_specific_metadata" :
        {
            "classes" : 80,
            "coordinates" : 4,
            "anchors" : [10,14, 23,27, 37,58, 81,82, 135,169, 344,319],
            "anchor_masks" :
            {
                "side26" : [1,2,3],
                "side13" : [3,4,5]
            },
            "iou_threshold" : 0.5,
            "confidence_threshold" : 0.5
        }
    },
    "mappings":
    {
        "labels":
        [
              "unknown",
              "face"
        ]
    }
}
Raw (see Custom handler on details how to create
handler.pyfile)
{
    "nn_config": {
        "output_format" : "raw",
        "input_size": "300x300"
    },
    "handler": "handler.py"
}
Run the demo script
Having the files in place, we can now run the demo with our custom model
And you should see the output and your NN results displayed (or printed in the console if raw was selected and
there is no handler file)
Be sure to check the advanced sections below or see Next steps
Custom handler
Custom handler is a file that the demo script will load and execute to parse the NN results. We specify this file with
handler config value, specifying a path to the file of preference. It also requires raw output format,
since it prevents the script from handling the results itself.
The handler.py file should contain two methods - decode(nn_manager, packet) and draw(nn_manager, data, frames)
def decode(nn_manager, packet):
  pass

def draw(nn_manager, data, frames):
  pass
The first method, decode, is called whenever a NN packet arrives from the pipeline (stored as a packet param)
also providing a nn_manager object that contains all nn-related info that was used by the script (like input size etc.).
The goal of this function is to decode the received packets from the NN blob into meaningful results that can later be displayed.
Second one, draw, is called with the NN results (returned from decode), nn_manager object and
frames array, having [(<frame_name>, <frame>), (<frame_name>, <frame>), ...] items. This array will
contain frames that were specified with the -s/--show param.
The goal of this function is to draw the decoded results onto received frames.
Below, you can find an example handle.py file that decodes and displays MobilenetSSD-based results.
import cv2
import numpy as np
from depthai_helpers.utils import frame_norm


def decode(nn_manager, packet):
    bboxes = np.array(packet.getFirstLayerFp16())
    bboxes = bboxes.reshape((bboxes.size // 7, 7))
    bboxes = bboxes[bboxes[:, 2] > 0.5]
    labels = bboxes[:, 1].astype(int)
    confidences = bboxes[:, 2]
    bboxes = bboxes[:, 3:7]
    return {
        "labels": labels,
        "confidences": confidences,
        "bboxes": bboxes
    }


decoded = ["unknown", "face"]


def draw(nn_manager, data, frames):
    for name, frame in frames:
        if name == nn_manager.source:
            for label, conf, raw_bbox in zip(*data.values()):
                bbox = frame_norm(frame, raw_bbox)
                cv2.rectangle(frame, (bbox[0], bbox[1]), (bbox[2], bbox[3]), (255, 0, 0), 2)
                cv2.putText(frame, decoded[label], (bbox[0] + 10, bbox[1] + 20), cv2.FONT_HERSHEY_TRIPLEX, 0.5, 255)
                cv2.putText(frame, f"{int(conf * 100)}%", (bbox[0] + 10, bbox[1] + 40), cv2.FONT_HERSHEY_TRIPLEX, 0.5, 255)
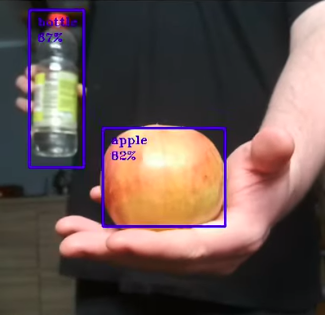
With the custom face detection model, using this code we receive the following output
We already use this handler mechanism to decode deeplabv3p_person, that comes as one of the available networks in the demo script to use
On-demand compilation
Since files in the IR format can be large, and we’re both downloading the blob and uploading IR format to the server,
we have incorporated an OpenVINO-like model.yml file structure that the BlobConverter server uses internally as well.
You can check how this file looks like in OpenVINO model zoo
or in available models in demo script.
This file is used by the OpenVINO model downloader that is used to download the required files for compilation. In our demo script, we use these files to provide a URL to the NN source files instead of uploading them along with the source code. It is also useful because on-demand compilation allows us to use the same configuration while requesting a different amount of MyriadX SHAVE cores.
To download the blob using model.yml file, run
$ python3 -m blobconverter --raw-config /path/to/model.yml --raw-name custom_model
You can also leave the model.yml file inside the resources/nn/<name> directory. This will make the demo script perform the conversion for you and run the received blob
$ python3 depthai_demo.py -cnn <name>
Customize the demo code
Callbacks file
If you’d like to add some custom functionalities to the demo yourself or just check how do certain variables look like, you can use a callbacks file, that should contain methods that the demo will call during execution on specific events.
An example of a callbacks file that is available in the repo is below
def shouldRun():
  pass  # Called to determine if the demo should be running


def onNewFrame(frame, source):
  pass  # Called when a new frame is available


def onShowFrame(frame, source):
    pass  # Called when a frame is about to be displayed


def onNn(nn_packet):
    pass  # Called when a new NN packet is available


def onReport(report):
    pass  # Called when a new report is available


def onSetup(*args, **kwargs):
    pass  # Called when the demo script is setting up


def onTeardown(*args, **kwargs):
    pass  # Called when the demo script is finishing


def onIter(*args, **kwargs):
    pass  # Called on each demo script iteration (internal loop)
These methods allow building custom functionalities on top of the demo script itself, whether it’s just printing or counting the data from NN or modifying how to display the frames or even make custom database/API connections to send the data to external destination.
By default, the demo script will use callbacks.py file in the repository, but this path can be changed using
-cb <path> / --callback <path> flags
Importing demo as a class
If preferred, the Demo script can also be imported like a regular class - this allows to control when the demo is starting up and when does it run. A simple example of how to run the demo from Python code is shown below
from depthai_demo import Demo
from depthai_helpers.arg_manager import parseArgs
from depthai_helpers.config_manager import ConfigManager

args = parseArgs()
conf = ConfigManager(args)
demo = Demo(onNewFrame=<fn>, onShowFrame=<fn>, onNn=<fn>, onReport=<fn>, onSetup=<fn>, onTeardown=<fn>, onIter=<fn>) # all params are optional
demo.run_all(conf)
Remember that PYTHONPATH env variable must contain a path do depthai repository for the imports to work.
Alternatively, you can place the script along depthai_demo.py in the repository.