Configuring Stereo Depth
- Stereo Depth Basics
- Stereo Depth Preset specifications
- Fixing noisy depth
- Improving depth accuracy
- Short range stereo depth
- Long range stereo depth
- Fixing noisy pointcloud
1
Stereo Depth Basics
Stereo depth vision works by calculating the disparity between two images taken from slightly different points.Stereo vision works a lot like our eyes. Our brains (subconsciously) estimate the depth of objects and scenes based on the difference between what our left eye sees versus what our right eye sees. On OAK-D cameras, it's exactly the same; we have left and right cameras (of the stereo camera pair) and the OAK does on-device disparity matching to estimate the depth of objects and scenes.Disparity refers to the distance between two corresponding points in the left and right image of a stereo pair.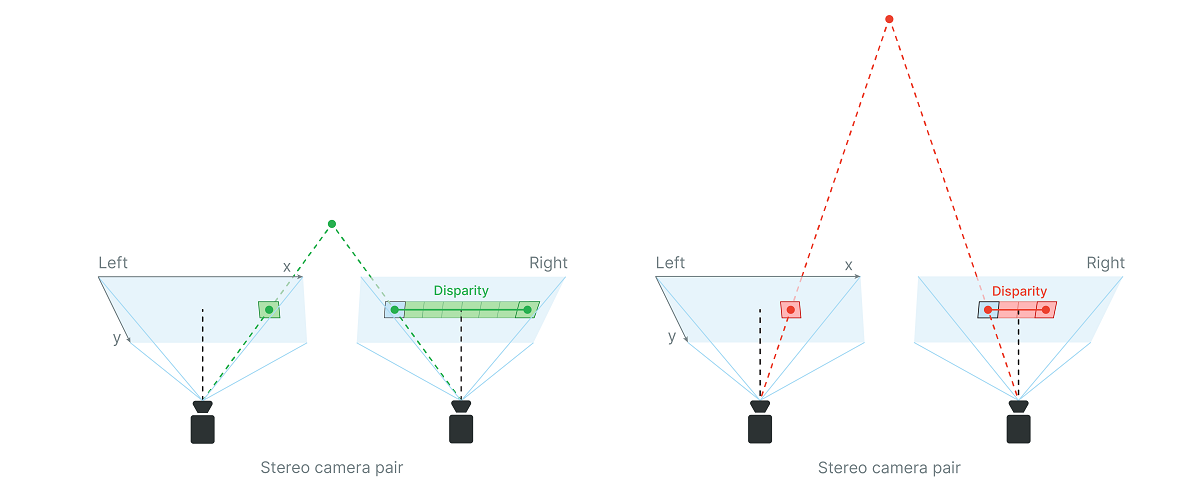 Let's first look at how the depth is calculated:Focal length is the distance between the camera lens and the image sensor. The larger the focal length, the narrower the FOV.You can read the camera's focal length (in pixels) from calibration, see the calibration dump here. The value itself varies depending on the camera model and resolution.Recommended approach: Use ImgTransformations to get the intrinsics matrix, as it is the main source of truth for the actual transformations applied to the image frames:Alternative approach: You can also read the camera's focal length from calibration:The focal length in pixels is written in camera intrinsics (Disparity and depth are inversely related. As disparity decreases, the depth increases exponentially depending on the baseline and focal length. Meaning, if the disparity value is close to zero, then a small change in disparity generates a large change in depth. Similarly, if the disparity value is big, then some change in disparity doesn't lead to a large change in depth (better accuracy).Here's a graph showing disparity vs depth for OAK-D (7.5cm baseline distance) at 800P:
 Full chart hereNote the value of depth data is stored in uint16, where 0 means that the distance is invalid/unknown.Looking at the depth formula above, we can see that either a larger baseline distance or a larger focal length will result in further depth at the same disparity, which means that the depth accuracy will be better.So to get long-range depth perception, you can increase the baseline distance and/or decrease the FOV.If the depth results for close-in objects look weird, this is likely because they are below the minimum depth-perception distance of the device.You can calculate the minimum stereo depth distance, for example OAK-D has a baseline of 7.5cm, focal_length_in_pixels of 882.5 pixels and the default maximum value for disparity_in_pixels is 95 the maximum value for disparity_in_pixels parameter (keep in mind it is inveresly related, so maximum value will yield the smallest result). We have:or roughly 70cm.However this distance can be cut in 1/2 (to around 35cm for the OAK-D) with the following options:or roughly 35cm.See these examples for how to enable Extended Disparity.Looking at the Depth from disparity section, from the graph it's clear that at the 95 disparity pixels (close distance), depth change between disparity pixels (eg. 95->94) is the lowest, so the depth accuracy is the best.
 Depth accuracy decreases exponentially with the distance from the camera. Note that with Stereo Subpixel mode enabled you can have better depth accuracy (even at a longer distance) but it only works to some extent.So to conclude, object/scene you are measuring should be as close as possible to MinZ (minimal depth perception) of the camera for best depth accuracy. You can find MinZ specification for each device in the Hardware documentation.The maximum depth perception distance depends on how baseline distance and focal length affect depth. The formula used to calculate this distance is an approximation, but is as follows:So using this formula for existing models the theoretical max distance is:If greater precision for long range measurements is required, consider enabling Subpixel Disparity or using a larger baseline distance between mono cameras. For a custom baseline, you could consider using OAK-FFC device or design your own baseboard PCB with required baseline. For more information see Subpixel Disparity under the Stereo Mode tab in Currently configurable blocks.
Depth from disparity
depth_cm- depth in centimetersfx_px- focal length in pixelsbaseline_cm- distance between two cameras of the stereo camera pairdisparity_px- disparity in pixels
Focal Length
Python
1import depthai as dai
2
3# Get intrinsics from ImgTransformations (recommended)
4disparity = disparityQueue.get()  # or depthQueue.get()
5intrinsics = disparity.getTransformation().getSourceIntrinsicMatrix()
6print('Focal length in pixels:', intrinsics[0][0])Python
1import depthai as dai
2
3with dai.Device() as device:
4  calibData = device.readCalibration()
5  intrinsics = calibData.getCameraIntrinsics(dai.CameraBoardSocket.CAM_C)
6 print('Right mono camera focal length in pixels:', intrinsics[0][0])intrinsics[0][0]):Disparity
Full chart hereNote the value of depth data is stored in uint16, where 0 means that the distance is invalid/unknown.How baseline distance and focal length affect depth
Wider FOV will result in worse depth accuracy, even at shorter ranges (where accuracy drop isn't as noticeable).
Min stereo depth distance
- Changing the resolution to 640x400, instead of the standard 1280x800.
- Enabling Extended Disparity.
Python
1min_distance = focal_length_in_pixels * baseline / disparity_in_pixels = 882.5 * 7.5cm / 190 = 34.84cmApplying both of those options is possible, which would set the minimum depth to 1/4 of the standard settings, but at such short distances the minimum depth is limited by focal length, which is 19.6cm, since OAK-D mono cameras have fixed focus distance: 19.6cm - infinity.
Move the camera closer to the object
Depth accuracy decreases exponentially with the distance from the camera. Note that with Stereo Subpixel mode enabled you can have better depth accuracy (even at a longer distance) but it only works to some extent.So to conclude, object/scene you are measuring should be as close as possible to MinZ (minimal depth perception) of the camera for best depth accuracy. You can find MinZ specification for each device in the Hardware documentation.Max stereo depth distance
Python
1Dm = (baseline/2) * tan((90 - HFOV / HPixels)*pi/180)Python
1# For OAK-D (7.5cm baseline)
2Dm = (7.5/2) * tan((90 - 71.9/1280)*pi/180) = 3825.03cm = 38.25 meters
3
4# For OAK-D-CM4 (9cm baseline)
5Dm = (9/2) * tan((90 - 71.9/1280)*pi/180) = 4590.04cm = 45.9 meters2
Stereo Depth Preset specifications
The StereoDepth node provides several profile presets that can be used to quickly configure the node for different scenarios. Each preset applies a specific combination of filters and parameters optimized for particular use cases.For information about FPS performance for each preset, see the Platform-Specific Configuration.RVC4 supports the following presets:For details on the filters, see Platform-Specific Configuration.ACCURACY Preset:Most parameters are consistent across all RVC4 presets:
RVC2
RVC4
RVC4
Available Presets
- ACCURACY: Prioritizes depth accuracy over fill-rate for precise depth measurements
- DENSITY: Prioritizes fill-rate and processing speed for dense depth maps at higher frame rates
Preset-Specific Differences
- Extended Disparity:
True - Subpixel:
True(4 bits, fixed for RVC4) - Software Left-Right Check:
False - Median Filter:
MEDIAN_OFF - Spatial Filter:
enable=False - Speckle Filter:
enable=True,speckleRange=200,differenceThreshold=2 - Temporal Filter:
enable=False - Decimation Filter:
decimationFactor=1(disabled),decimationMode=NON_ZERO_MEAN - Adaptive Median Filter:
enable=True,confidenceThreshold=200 - Hole Filling:
enable=True,highConfidenceThreshold=240,fillConfidenceThreshold=251,minValidDisparity=1 - Confidence Threshold:
97 - Confidence Metrics:
- Occlusion Confidence Weight:
14 - Motion Vector Confidence Weight:
16 - Motion Vector Confidence Threshold:
1 - Flatness Confidence Weight:
2 - Flatness Confidence Threshold:
4 - Flatness Override:
False
- Occlusion Confidence Weight:
- Census Transform:
noiseThresholdOffset=0,noiseThresholdScale=84 - Threshold Filter:
minRange=0,maxRange=65535 - Brightness Filter:
minBrightness=0,maxBrightness=256
- Extended Disparity:
True - Subpixel:
True(4 bits, fixed for RVC4) - Software Left-Right Check:
True(threshold: 4) - Median Filter:
KERNEL_5x5 - Spatial Filter:
enable=False - Speckle Filter:
enable=True,speckleRange=200,differenceThreshold=2 - Temporal Filter:
enable=False - Decimation Filter:
decimationFactor=1(disabled),decimationMode=PIXEL_SKIPPING - Adaptive Median Filter:
enable=True,confidenceThreshold=200 - Hole Filling:
enable=False - Confidence Threshold:
20 - Confidence Metrics:
- Occlusion Confidence Weight:
28 - Motion Vector Confidence Weight:
0 - Motion Vector Confidence Threshold:
1 - Flatness Confidence Weight:
4 - Flatness Confidence Threshold:
4 - Flatness Override:
False
- Occlusion Confidence Weight:
- Census Transform:
noiseThresholdOffset=0,noiseThresholdScale=-40 - Threshold Filter:
minRange=0,maxRange=65535 - Brightness Filter:
minBrightness=-1,maxBrightness=256
Common Parameters
- Subpixel: 4 bits (fixed for RVC4)
- Extended Disparity:
True - Spatial Filter:
enable=False - Speckle Filter:
enable=True,speckleRange=200,differenceThreshold=2 - Temporal Filter:
enable=False - Decimation Filter:
decimationFactor=1(disabled) - Adaptive Median Filter:
enable=True,confidenceThreshold=200 - Threshold Filter:
minRange=0,maxRange=65535
3
Fixing noisy depth
A few topics we have noticed that are relevant for stereo depth quality are:Due to the way the stereo matching algorithm works, passive stereo depth requires to have a good texture in the scene, otherwise, the depth will be noisy/invalid. low-visual-interest surfaces (blank surfaces with little to no texture), such as a wall or floor.Solution: Our OAK Pro version of OAK cameras have onboard IR laser dot projector, which projects thousands of little dots on the scene, which helps the stereo matching algorithm as it provides more texture to the scene.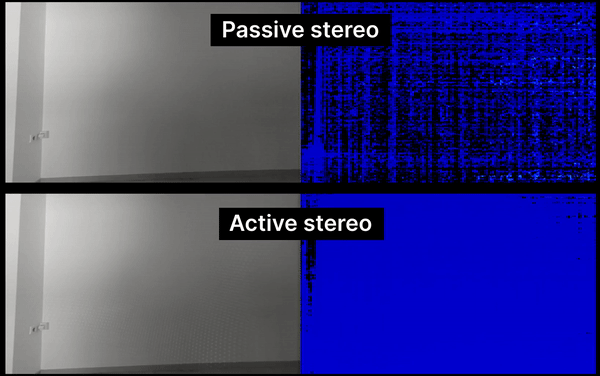 The technique that we use is called ASV (Conventional Active Stereo Vision) as stereo matching is performed on the device the same way as on a passive stereo OAK-D.When calculating the disparity, each pixel in the disparity map gets assigned a confidence value If input left/right images are noisy, the disparity map will be noisy as well. So the prerequisite for good depth are high IQ (see Image Quality docs) left/right stereo images. Active stereo (OAK Pro version of OAK cameras) mostly alleviates this issue, but for passive stereo cameras, there are a few things you can do to improve the quality of the stereo camera pair.It is preferred to use mono (grayscale) cameras for the stereo camera pair as they have better quantum efficiency (QE) as they don't have color (Bayer) filter. Higher QE means more signal will be generated for the same amount of light (photons), which leads to better SNR (signal-to-noise ratio).For better low-light performance, it's advised to use longer exposure times instead of higher gain (ISO) as it will improve SNR. Sometimes this means lowering camera FPS - at 30 FPS, you can use 1/30s exposure time, at 15 FPS, you can use 1/15s exposure time, etc. For more information, see Low-light increased sensitivity.Another potential improvement is to tweak the sensor's ISP settings, like chroma & luma denoise, and sharpness. For more information, see the Color camera ISP configuration.The StereoDepth node has a few postprocessing filters that run on-device, which can be enabled to improve the quality of the disparity map. For implementation (API) details, see StereoDepth configurable blocks.As these filters run on the device, it has a some performance cost, which means that at high-resolution frames (1MP) these might bottleneck the FPS. To improve the cost, one should consider using lower-resolution frames (eg. 400P) and/or using Decimation filter. Due to additional processing, these filters also introduce additional latency.This is a non-edge preserving Median filter, which can be used to reduce noise and smoothen the depth map. Median filter is implemented in hardware, so it's the fastest filter.Speckle Filter is used to reduce the speckle noise. Speckle noise is a region with huge variance between neighboring disparity/depth pixels, and speckle filter tries to filter this region.Temporal Filter is intended to improve the depth data persistency by manipulating per-pixel values based on previous frames. The filter performs a single pass on the data, adjusting the depth values while also updating the tracking history.In cases where the pixel data is missing or invalid, the filter uses a user-defined persistency mode to decide whether the missing value should be improved with stored data. Note that due to its reliance on historic data, the filter may introduce visible motion blurring/smearing artifacts, and therefore is best-suited for static scenes.Spatial Edge-Preserving Filter will fill invalid depth pixels with valid neighboring depth pixels. It performs a series of 1D horizontal and vertical passes or iterations, to enhance the smoothness of the reconstructed data. It is based on this research paper.Brightness filter will filter out (invalidate, by setting to 0) all depth pixels for which input stereo camera image pixels are outside the configured min/max brightness threshold values. This filter is useful when you have a high dynamic range scene, like outside on a bright day, or in general whenever stereo camera pair can directly see a light source:
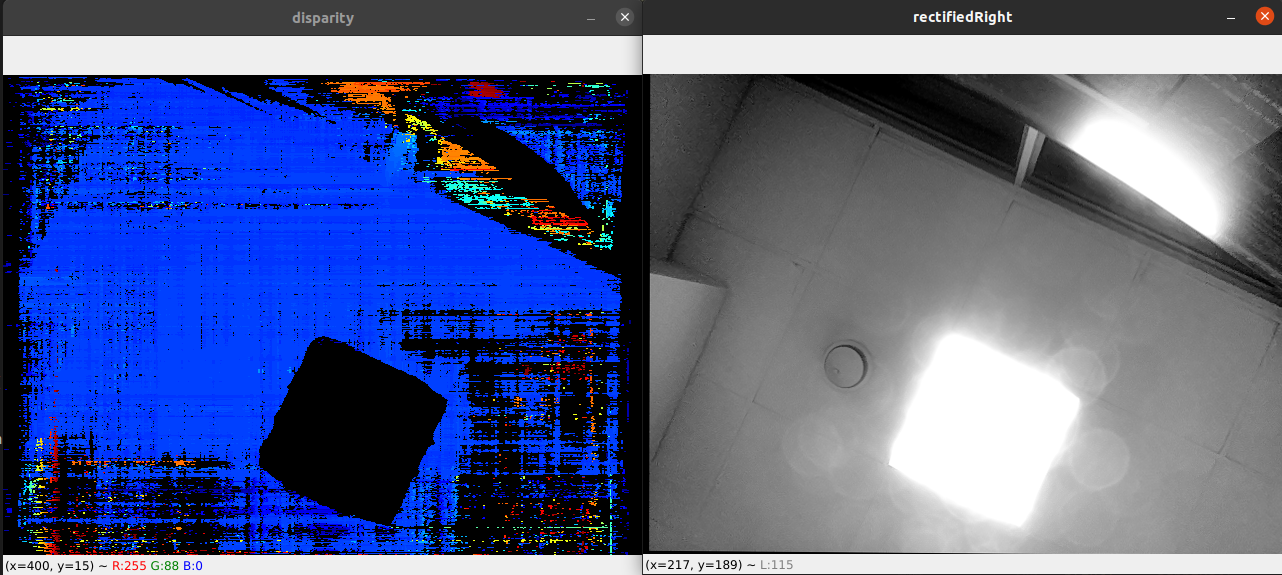 It also helps with rectification "artifacts", especially when you have Wide FOV lenses and you apply alpha param. When there's no available pixel, StereoDepth node will set that area to 0 (black) by default, but can be changed with
 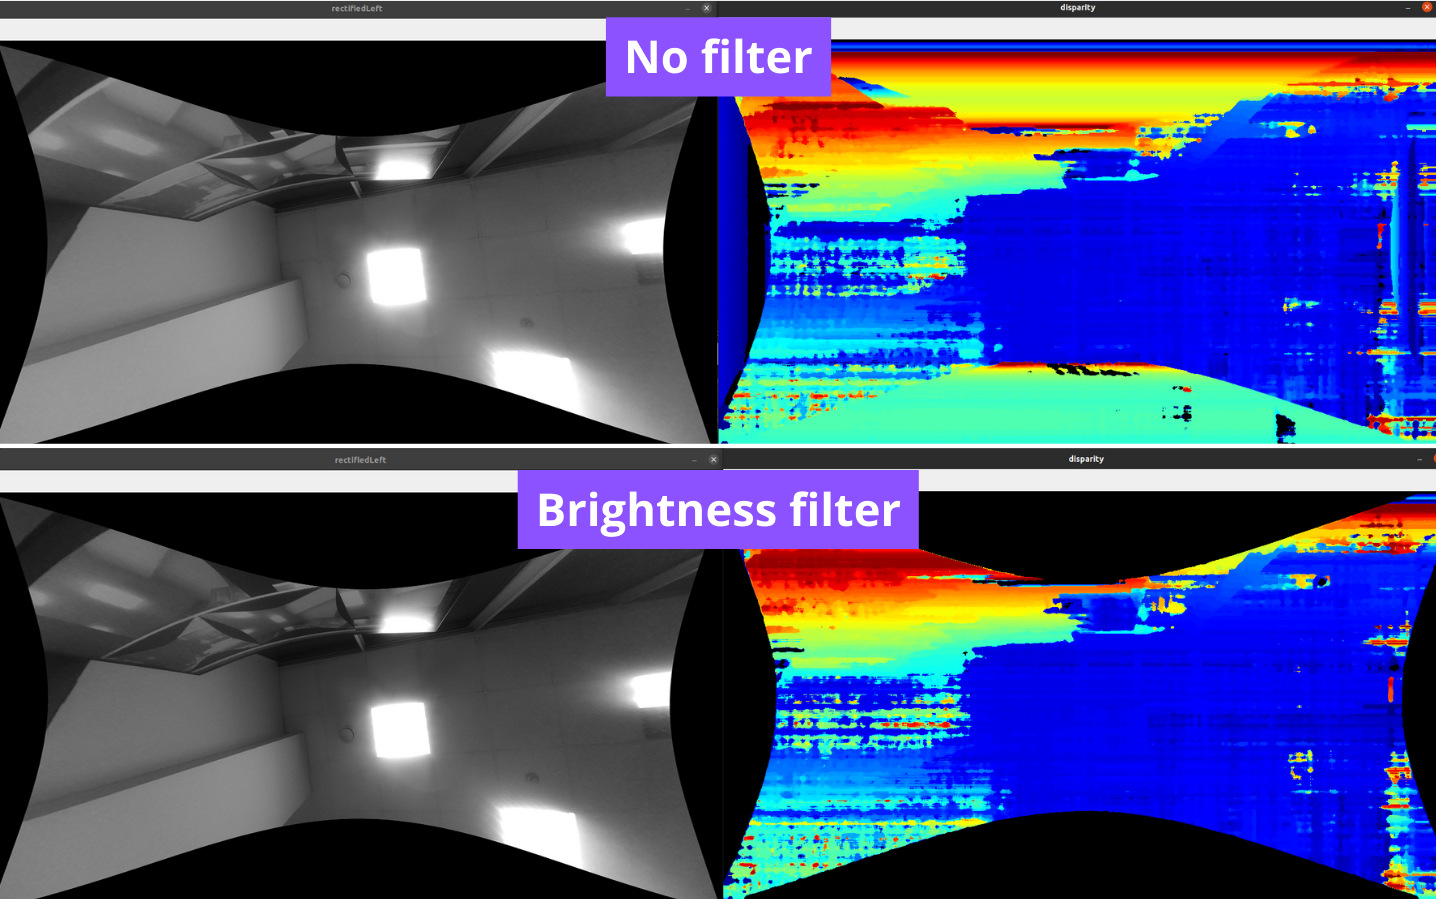 Threshold filter will filter out all depth pixels outside the configured min/max threshold values. In a controlled environment, where you know exactly how far the scene can be (eg. 30cm - 2m) it's advised to use this filter.Decimation Filter will sub-sample the depth map, which means it reduces the depth scene complexity and allows other filters to run faster. Setting decimationFactor to 2 will downscale 1280x800 depth map to 640x400. We can either select pixel skipping, median, or mean decimation mode, and the latter two modes help with filtering as well. decimationFactor 1 disables the filter.It's also very useful for pointclouds.The order of the filters is important, as the output of one filter is the input of the next filter. The order of the filters is customizable and can be set via
Scene Texture
The technique that we use is called ASV (Conventional Active Stereo Vision) as stereo matching is performed on the device the same way as on a passive stereo OAK-D.Stereo depth confidence threshold
0..255 by the stereo matching algorithm. This confidence score is kind of inverted (if, say, comparing with NN confidences):- 0 - maximum confidence that it holds a valid value
- 255 - minimum confidence, so there is more chance that the value is incorrect
Python
C++
Python
Python
1# Create the StereoDepth node
2stereo_depth = pipeline.create(dai.node.StereoDepth)
3stereo_depth.initialConfig.setConfidenceThreshold(threshold)
4
5# Or, alternatively, set the Stereo Preset Mode:
6# Prioritize fill-rate, sets Confidence threshold to 245
7stereo_depth.setDefaultProfilePreset(dai.node.StereoDepth.PresetMode.HIGH_DENSITY)
8# Prioritize accuracy, sets Confidence threshold to 200
9stereo_depth.setDefaultProfilePreset(dai.node.StereoDepth.PresetMode.HIGH_ACCURACY)Stereo camera pair noise
Stereo postprocessing filters
If the pipeline complains about shave/memory allocation, try increasing the HW resources used in postprocessing with
setPostProcessingHardwareResources(n_shaves, n_cmx) --> stereoDepth.setPostProcessingHardwareResources(3, 3).Median filter
Speckle filter
Temporal filter
Spatial filter
Brightness filter
Direct light source (ceiling light) - depth pixels are invalid
It also helps with rectification "artifacts", especially when you have Wide FOV lenses and you apply alpha param. When there's no available pixel, StereoDepth node will set that area to 0 (black) by default, but can be changed with stereoDepth.setRectifyEdgeFillColor(int8). This black area can then be invalidated with brightness filter, as seen below:Invalidating depth where we have rectification 'artifacts'
Threshold filter
Decimation filter
Filtering order
Python
1config.postProcessing.filteringOrder = [
2  dai.RawStereoDepthConfig.PostProcessing.Filter.TEMPORAL,
3  dai.RawStereoDepthConfig.PostProcessing.Filter.SPECKLE,
4  dai.RawStereoDepthConfig.PostProcessing.Filter.SPATIAL,
5  dai.RawStereoDepthConfig.PostProcessing.Filter.MEDIAN,
6  dai.RawStereoDepthConfig.PostProcessing.Filter.DECIMATION
7]
4
Improving depth accuracy
The above chapter we focused on noise, which isn't necessarily the only reason for inaccurate depth.There are a few ways to improve depth accuracy:Let's first start with what Stereo Subpixel mode is and how it works. For image subpixel explanation, see What's subpixel?.When calculating disparity depth, stereo matching algorithm assigns a "confidence" score for each disparity pixel, which means each pixel of the depth image contains 96 bytes (for confidence). If you are interested in all these cost values, you can use 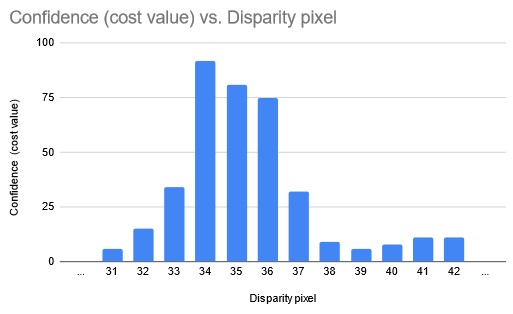 Stereo Subpixel mode will calculate subpixel disparity by looking at the confidence values of the 2 neighboring disparity pixels in each direction. In the above example graph, in normal mode, StereoDepth would just get the max disparity = 34 pixels, but in Subpixel mode, it will return a bit more, eg. 34.375 pixels, as confidences for pixels 35 and 36 are quite high as well.TL;DR: Stereo Subpixel mode should always provide more accurate depth, but will consume additional HW resources (see Stereo depth FPS for impact).Default stereo depth output has 0..95 disparity pixels, which would produce 96 unique depth values. This can especially be seen when using pointcloud representation and seeing how there are discrete "layers" of points, instead of a smooth transition:
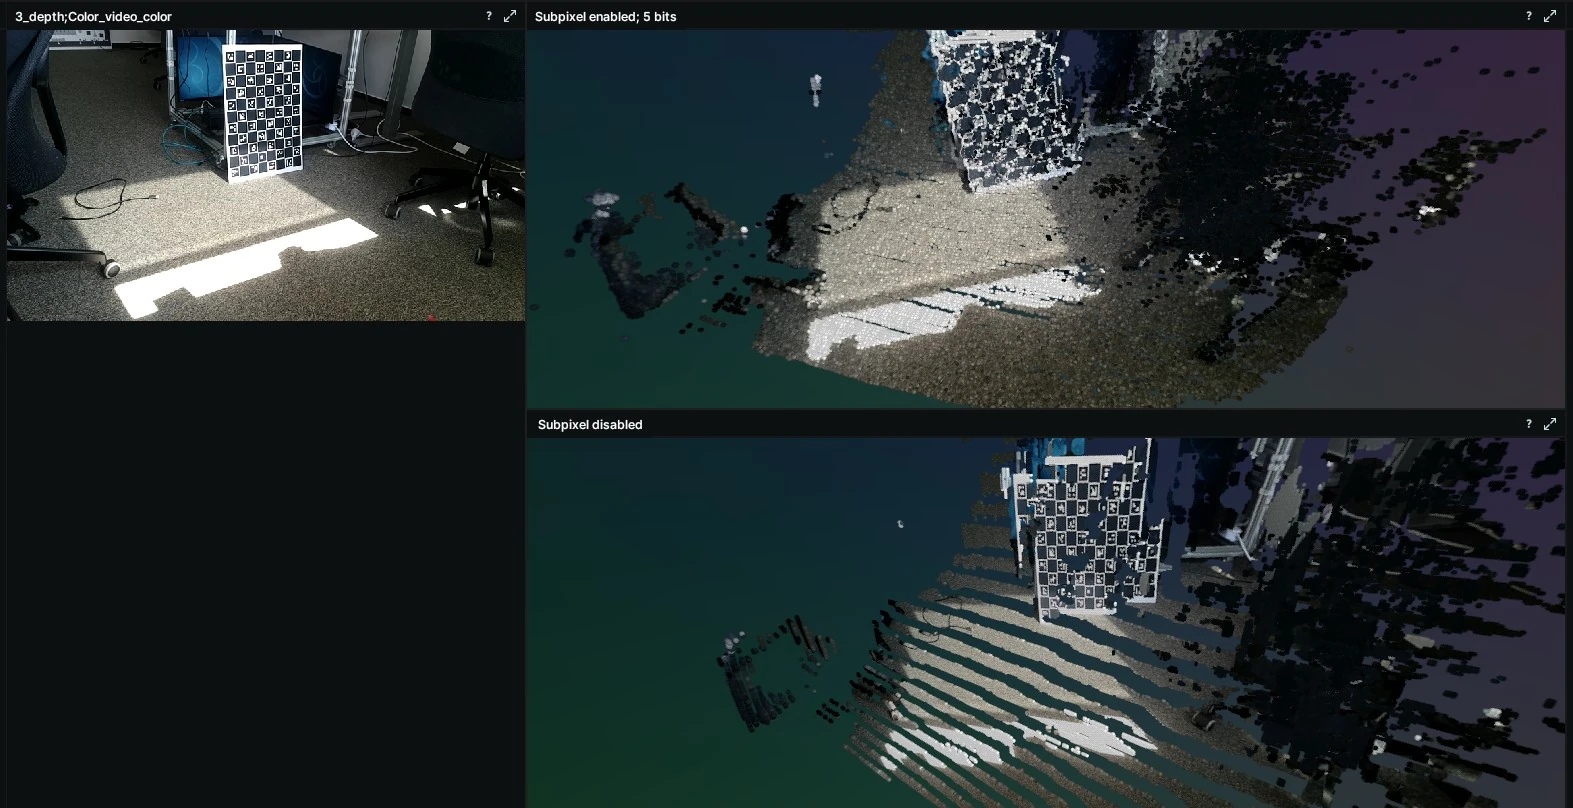 This layering can especially be seen at longer distances, where these layers are exponentially further apart.But with Stereo Subpixel mode enabled, there are many more unique values possible, which produces more granular depth steps, and thus smoother a pointcloud.
One can change the number of subpixel bits by setting
- (mentioned above) Fixing noisy depth - depth should be high quality in order to be accurate
- (mentioned above) Stereo depth confidence threshold should be low(er) in order to get the best accuracy
- Enable Stereo Subpixel mode, especially if the object/scene isn't close to MinZ of the camera
Stereo Subpixel mode
The stereo depth pipeline is very complex (see Internal block diagram of StereoDepth node), and we will simplify it here for better understanding. It actually doesn't use confidence (eg.
stereoDepth.confidenceMap output), but cost dump, which is what is used to calculate confidence values.stereoDepth.debugDispCostDump output, just note it's a very large output (eg. 1280*800*96 => 98MB for each frame).Stereo Subpixel mode will calculate subpixel disparity by looking at the confidence values of the 2 neighboring disparity pixels in each direction. In the above example graph, in normal mode, StereoDepth would just get the max disparity = 34 pixels, but in Subpixel mode, it will return a bit more, eg. 34.375 pixels, as confidences for pixels 35 and 36 are quite high as well.TL;DR: Stereo Subpixel mode should always provide more accurate depth, but will consume additional HW resources (see Stereo depth FPS for impact).Stereo subpixel effect on layering
This layering can especially be seen at longer distances, where these layers are exponentially further apart.But with Stereo Subpixel mode enabled, there are many more unique values possible, which produces more granular depth steps, and thus smoother a pointcloud.| Subpixel Fractional Bits | Number of Unique Values |
|---|---|
| 3 | 754 |
| 4 | 1506 |
| 5 | 3010 |
stereoDepth.setSubpixelFractionalBits(int) parameter to 3, 4 or 5 bits.5
Short range stereo depth
To get accurate short-range depth, you'd first need to follow Improving depth accuracy steps. For most normal-FOV, OV9282 OAK-D* cameras, you'd want to have the object/scene about 70cm away from the camera, where you'd get below 2% error (with good Scene Texture), so ± 1.5cm error.But how to get an even better depth accuracy, eg. sub-cm stereo depth accuracy? As we have learned at How baseline distance and focal length affect depth, we would want to have a closer baseline distance and/or narrower FOV lenses.That's why for the short-range depth perception we suggest using the OAK-D SR or the OAK-D ToF, as they have 2 cm baseline distance, 800P resolution, and is ideal for depth sensing of up to 1 meter.Going back to Depth from disparity, minimal depth perception (MinZ) is defined by the following formula, where the disparity is 95 pixels (maximum number of pixel for disparity search):If the depth results for close-in objects look weird, this is likely because they are below MinZ distance of the OAK camera. You can get lower MinZ for OAK cameras by either:Above we have a formula for MinZ, and by lowering the resolution, we are lowering focal length (in pixels), so let's look at the formula again:As you can see, by lowering resolution by 2, we are also lowering MinZ by 2. Note that because you have fewer pixels, you will also have lower depth accuracy (in cm).Very similar to Lowering resolution to decrease MinZ, Extended mode runs stereo depth pipeline twice (thus consuming more HW resources); once with resolution of the frame that was passed to StereoDepth node, and once with resolution downscaled by 2, then combines the 2 output disparity maps.Disparity companding does sparse disparity matching: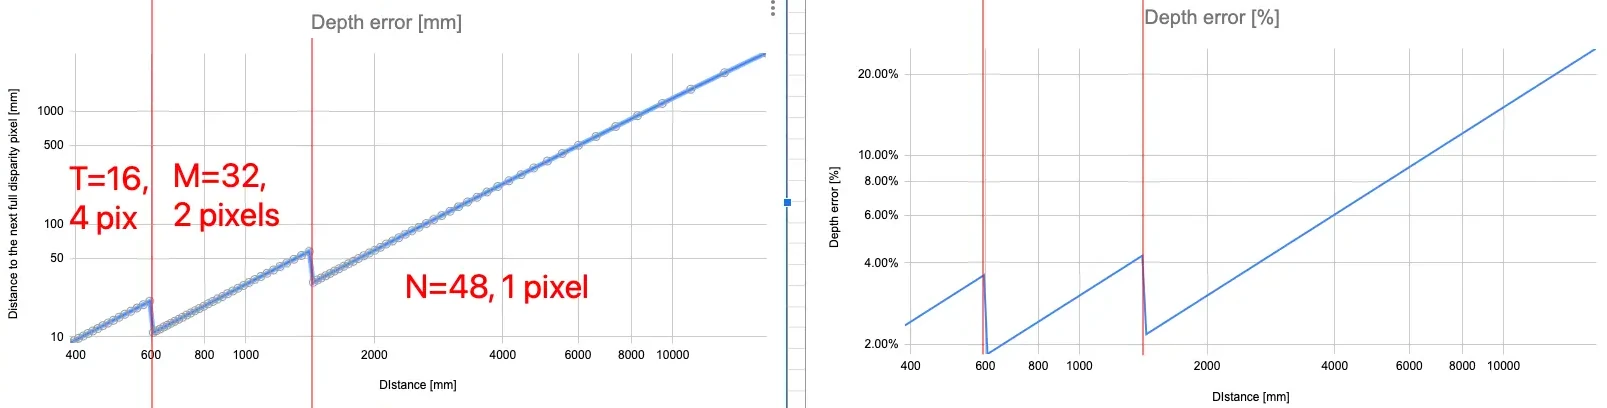 Google Sheets here for the above graph. Note that this graph is for full-pixel disparity, when enabling subpixel mode the accuracy will be better (see Stereo depth accuracy docs).In a controlled environment, where MaxZ is known in advance, to perceive closer depth range it's advised to use disparity shift, as it doesn't decrease depth accuracy as the other 2 methods above do.Disparity shift will shift the starting point of the disparity search, which will significantly decrease MaxZ, but it will also decrease the MinZ. Disparity shift can be combined with extended/subpixel/LR-check modes.
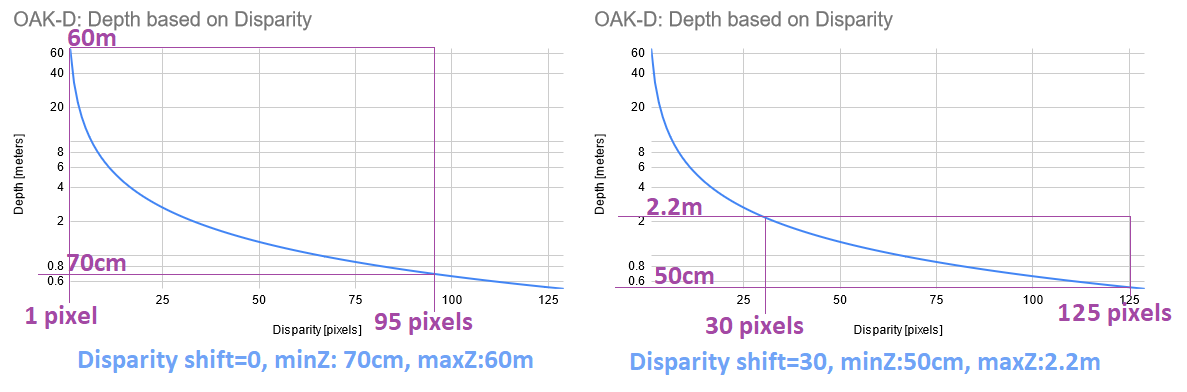 The Left graph shows min and max disparity and depth for OAK-D (7.5cm baseline, 800P resolution, ~70° HFOV) by default (disparity shift=0). See Depth from disparity. Since hardware (stereo block) has a fixed 95 pixel disparity search, DepthAI will search from 0 pixels (depth=INF) to 95 pixels (depth=71cm).Limitations: The Right graph shows the same, but at disparity shift set to 30 pixels. This means that disparity search will be from 30 pixels (depth=2.2m) to 125 pixels (depth=50cm). This also means that depth will be very accurate at the short range (theoretically below 5mm depth error).
Since depth is calculated from disparity, which requires the pixels to overlap, there is inherently a vertical band on the left side of the left mono camera and on the right side of the right mono camera, where depth can not be calculated, since it is seen by only 1 stereo camera. That band is marked with 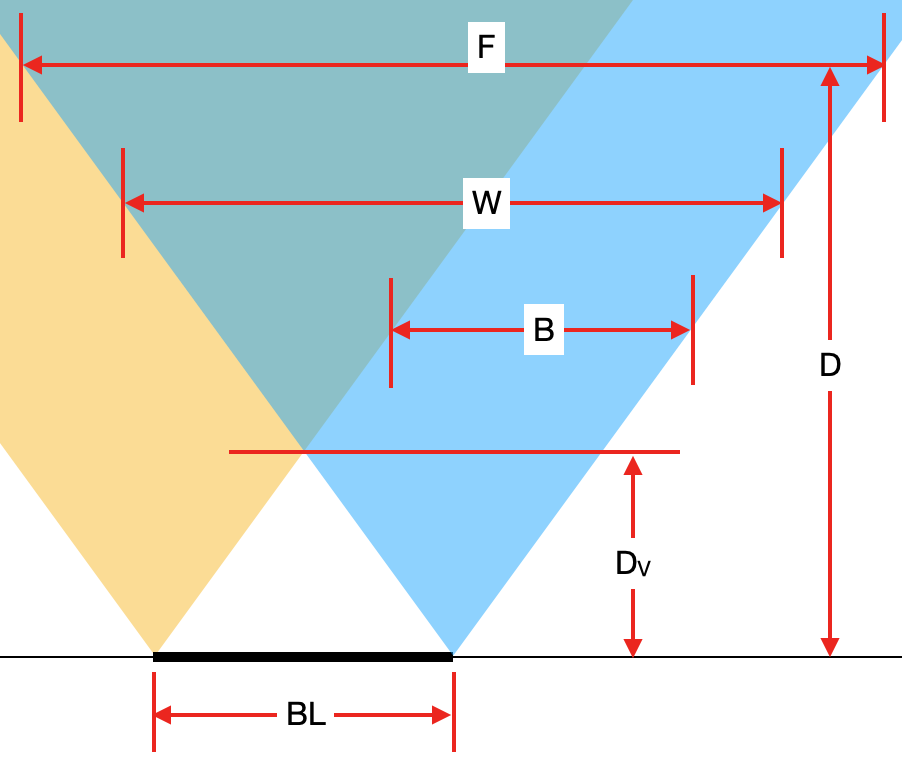 At very close distance, even when enabling Stereo Extended Disparity mode and Lowering resolution, you will notice this vertical band of invalid depth pixel.Meaning of variables on the picture:
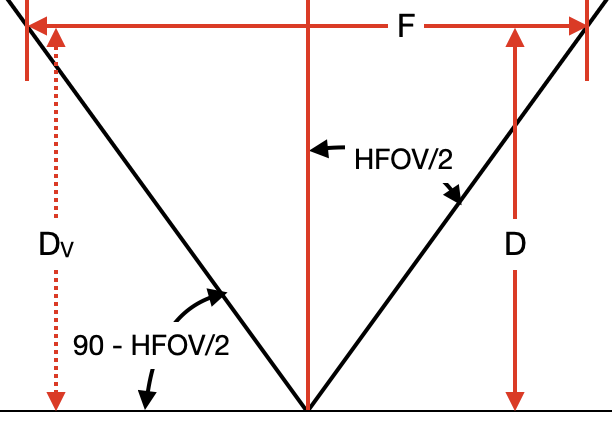 With the use of the Credit for calculations and images goes to our community member gregflurry, which he made on this forum post.Because the depth map contains the Z distance, objects in parallel with the camera are measured accurately standard. For objects not in parallel, the Euclidean distance calculation can be used. Please refer to the below:
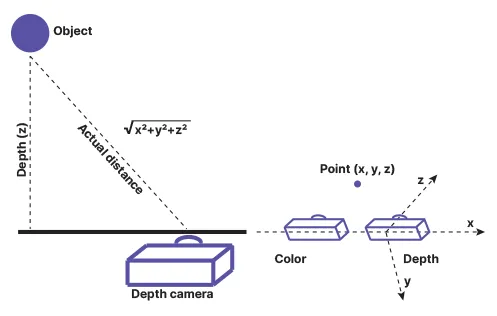 When running eg. the RGB & Yolo with spatial data example, you could calculate the distance to the detected object from XYZ coordinates (SpatialImgDetections) using the code below (after code line
How to get lower MinZ
- Lowering resolution
- Enabling Stereo Extended Disparity mode
- Enabling Stereo companding mode
- Using Disparity shift - suggested in a controlled environment, where MaxZ is known
Lowering resolution to decrease MinZ
Stereo Extended Disparity mode
Stereo companding mode
- First 48 pixels it does pixel by pixel matching, meaning at longer range there's no downside
- Next 32 pixels it does matching every 2nd pixel, so accuracy is halved (at closer range)
- Last 16 pixel it does matching every 4th pixel, so accuracy is quartered (at closest range). Because accuracy is the best at closest range anyways, this is can be a good tradeoff.
Companding - effect on accuracy (75mm baseline, 800P, Normal FOV)
Google Sheets here for the above graph. Note that this graph is for full-pixel disparity, when enabling subpixel mode the accuracy will be better (see Stereo depth accuracy docs).Python
1stereo = pipeline.create(dai.node.StereoDepth)
2cfg = stereo.initialConfig.get()
3# Enable companding mode
4cfg.costMatching.enableCompanding = True
5stereo.initialConfig.set(cfg)
Disparity shift
The Left graph shows min and max disparity and depth for OAK-D (7.5cm baseline, 800P resolution, ~70° HFOV) by default (disparity shift=0). See Depth from disparity. Since hardware (stereo block) has a fixed 95 pixel disparity search, DepthAI will search from 0 pixels (depth=INF) to 95 pixels (depth=71cm).Limitations: The Right graph shows the same, but at disparity shift set to 30 pixels. This means that disparity search will be from 30 pixels (depth=2.2m) to 125 pixels (depth=50cm). This also means that depth will be very accurate at the short range (theoretically below 5mm depth error).- Because of the inverse relationship between disparity and depth, MaxZ will decrease much faster than MinZ as the disparity shift is increased. Therefore, it is advised not to use a larger-than-necessary disparity shift.
- The tradeoff in reducing the MinZ this way is that objects at distances farther away than MaxZ will not be seen.
- Because of the point above, we only recommend using disparity shift when MaxZ is known, such as having a depth camera mounted above a table pointing down at the table surface.
- Output disparity map is not expanded, only the depth map. So if disparity shift is set to 50, and disparity value obtained is 90, the real disparity is 140.
- (+) Is faster, as it doesn't require an extra computation, which means there's also no extra latency
- (-) Reduces the MaxZ (significantly), while extended disparity only reduces MinZ.
method
depthai.StereoDepthConfig.setDisparityShift
Close range depth limitations
B on the following picture.At very close distance, even when enabling Stereo Extended Disparity mode and Lowering resolution, you will notice this vertical band of invalid depth pixel.Meaning of variables on the picture:BL [cm]- Baseline of stereo cameras.Dv [cm]- Minimum distance where both cameras see an object (thus where depth can be calculated).B [pixels]- Width of the band where depth cannot be calculated.W [pixels]- Width of mono in pixels camera or amount of horizontal pixels, also noted asHPixelsin other formulas.D [cm]- Distance from the camera plane to an object (see image Measuring real-world object dimensions).F [cm]- Width of image at the distanceD.
With the use of the tan function, the following formulas can be obtained:F = 2 * D * tan(HFOV/2)Dv = (BL/2) * tan(90 - HFOV/2)
B, we can use tan function again (same as for F), but this time we must also multiply it by the ratio between W and F in order to convert units to pixels. That gives the following formula:Example: If we are using OAK-D, which has a HFOV of 72°, a baseline (BL) of 7.5 cm and 640x400 (400P) resolution is used, therefore W = 640 and an object is D = 100 cm away, we can calculate B in the following way:Command Line
1Dv = 7.5 / 2 * tan(90 - 72/2) = 3.75 * tan(54°) = 5.16 cm
2B = 640 * 5.16 / 100 = 33 # pixelsMeasuring real-world object dimensions
When running eg. the RGB & Yolo with spatial data example, you could calculate the distance to the detected object from XYZ coordinates (SpatialImgDetections) using the code below (after code line 143 of the example):Python
1distance = math.sqrt(detection.spatialCoordinates.x ** 2 + detection.spatialCoordinates.y ** 2 + detection.spatialCoordinates.z ** 2) # mm6
Long range stereo depth
To get accurate long-range depth, we should first check Improving depth accuracy steps, as they are especially applicable to long-range depth.For long-range depth, we should also consider the following:
- Narrow FOV lenses
- Wide baseline distance between stereo cameras
7
Fixing noisy pointcloud
For noisy pointcloud we suggest a few approaches:Decimation filter is especially useful for pointclouds, you don't really want 1 million points (even though it sounds good for marketing), as it's too much data to process. Decimation filter helps here, and should be enabled when working with pointclouds.When using decimation filter for pointcloud you should enable median/mean mode decimation, as it will provide additional filtering (compared to pixel skipping mode). It also makes other Stereo postprocessing filters faster, since there will be less data to process.There are often invalid/noisy pixels around the corners, and we have seen that some customers preventively invalidate a few pixels (eg. 3) all around the corner of depth image. We also suggest enabling Brightness filter, especially due to rectification "artifacts".Besides device-side Stereo postprocessing filters, we also suggest running host-side pointcloud filtering (with eg. Open3D, or PCL library).We especially suggest using pointcloud voxalization and removing statistical outliers techniques, example here for both of these.
- (mentioned above) Start with the Fixing noisy depth chapter, as otherwise, noise will produce points all over the pointcloud
- (mentioned above) Continue with the Improving depth accuracy chapter - depth inaccuracy will be easily visible in pointcloud
- Enable Stereo subpixel mode, especially due to the Stereo subpixel effect on layering
- Decimation filter for pointcloud for faster processing (FPS) and additional filtering
- Invalidating pixels around the corner should help to reduce noise around the corners of the depth frame
- Host-side pointcloud filtering for additional filtering