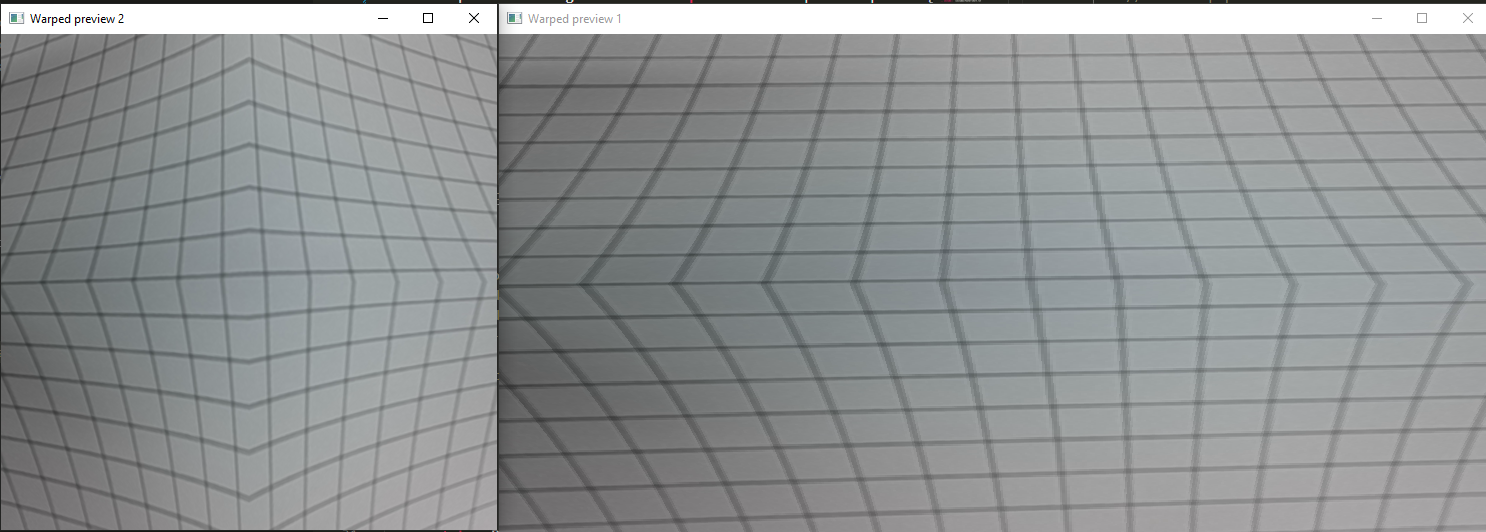
Demo
 This example requires the DepthAI v3 API, see installation instructions.
Pipeline
Source code
Python
C++
Python
PythonGitHub
1#!/usr/bin/env python3
2import cv2
3import depthai as dai
4
5
6# This script demonstrates how to use a warp mesh in DepthAI to transform
7# incoming camera frames. A warp mesh is a grid of points where each point
8# indicates from which location in the source image we sample pixels to place
9# in the corresponding location of the output image.
10
11# 3x3 WARP MESH (SAMPLE SHIFTS):
12# ------------------------------
13# Conceptually, we have 9 points arranged like this:
14
15#     p0 ----- p1 ----- p2
16#       |       |       |
17#     p3 ----- p4 ----- p5
18#       |       |       |
19#     p6 ----- p7 ----- p8
20
21# Each point is defined by an (x, y) coordinate in the source image.
22# If all points were placed in their "natural" positions, we'd get
23# an identity (no distortion) mapping. By shifting one or more points,
24# we create warping or perspective effects.
25
26# For example, if p3 is shifted horizontally, then at that grid
27# position, we "pull" pixels from a different horizontal location,
28# causing a horizontal distortion across that row.
29
30# Below, we show how to create a slightly shifted 3x3 mesh.
31# Feel free to adjust the coordinates to see how the output changes.
32
33
34# Create pipeline
35pipeline = dai.Pipeline()
36
37width, height = 1280, 800
38camRgb = pipeline.create(dai.node.Camera).build(dai.CameraBoardSocket.CAM_A)
39
40platform = pipeline.getDefaultDevice().getPlatform()
41imgType = dai.ImgFrame.Type.BGR888p if platform == dai.Platform.RVC2 else dai.ImgFrame.Type.NV12
42
43cameraOutput = camRgb.requestOutput((width, height), type=imgType)
44originalFrameQueue = cameraOutput.createOutputQueue()
45
46# Define a 3x3 warp mesh with a small horizontal shift towards the center the middle row
47# and a small vertical shift towar
48# Each point tells the warp node from which source coordinate
49# to sample pixels for the final output.
50p0_3x3 = dai.Point2f(0, 0)
51p1_3x3 = dai.Point2f(width / 2, 200) # Identity would be (width / 2, 0)
52p2_3x3 = dai.Point2f(width, 0)
53
54p3_3x3 = dai.Point2f(300, height / 2) # Identity would be (0, height / 2)
55p4_3x3 = dai.Point2f(width / 2, height / 2)
56p5_3x3 = dai.Point2f(width - 300, height / 2) # Identity would be (width, height / 2)
57
58p6_3x3 = dai.Point2f(0, height)
59p7_3x3 = dai.Point2f(width / 2, height - 200) # Identity would be (width / 2, height)
60p8_3x3 = dai.Point2f(width, height)
61
62# Create and configure the Warp node
63warp = pipeline.create(dai.node.Warp)
64warp.setWarpMesh([
65    p0_3x3, p1_3x3, p2_3x3,
66    p3_3x3, p4_3x3, p5_3x3,
67    p6_3x3, p7_3x3, p8_3x3
68], 3, 3)
69
70# Set output size and frame limits
71warpOutputSize = (640, 480)
72warp.setOutputSize(warpOutputSize)
73warp.setMaxOutputFrameSize(warpOutputSize[0] * warpOutputSize[1] * 3)
74warp.setInterpolation(dai.Interpolation.BILINEAR)
75
76cameraOutput.link(warp.inputImage)
77warpQueue = warp.out.createOutputQueue()
78
79# Start the pipeline
80pipeline.start()
81with pipeline:
82    while True:
83        # Get and show original frame
84        originalFrame = originalFrameQueue.get()
85        assert isinstance(originalFrame, dai.ImgFrame)
86        cv2.imshow("Original", originalFrame.getCvFrame())
87
88        # Get and show warped frame
89        warpedFrame = warpQueue.get()
90        assert isinstance(warpedFrame, dai.ImgFrame)
91        if platform == dai.Platform.RVC4:
92            warpedFrame.setType(dai.ImgFrame.Type.GRAY8) # Chroma plane warping is not yet supported on RVC4
93        cv2.imshow("Warped", warpedFrame.getCvFrame())
94
95        if cv2.waitKey(1) == ord('q'):
96            break
Need assistance?
Head over to Discussion Forum for technical support or any other questions you might have.