Power-over-Ethernet (PoE) allows ethernet cable to be used to both power a device and give it connectivity with 1 Gbps bandwidth full-duplex at up to 100 meters (328 feet).
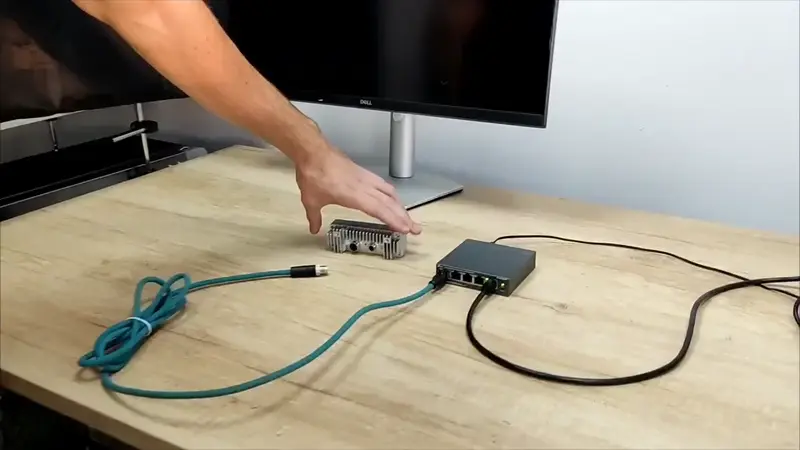
You will need a PoE switch or Injector to power the PoE device (see Powering PoE devices).After powering the device, the power LED on the switch/injector should turn on, as on the video below.
RJ45 PoE connector
M12 PoE connector
Make sure to properly tighten the connector - either ethernet gland for RJ45 PoE cameras, or the M12 connector - to make a good seal. This ensures that the device meets its IP rating.
Cable diameter
The ethernet cable diameter for RJ45 PoE cameras should be between 5mm and 7mm to fit the gland. Higher diameter will not fit, and lower diameter will not seal properly.
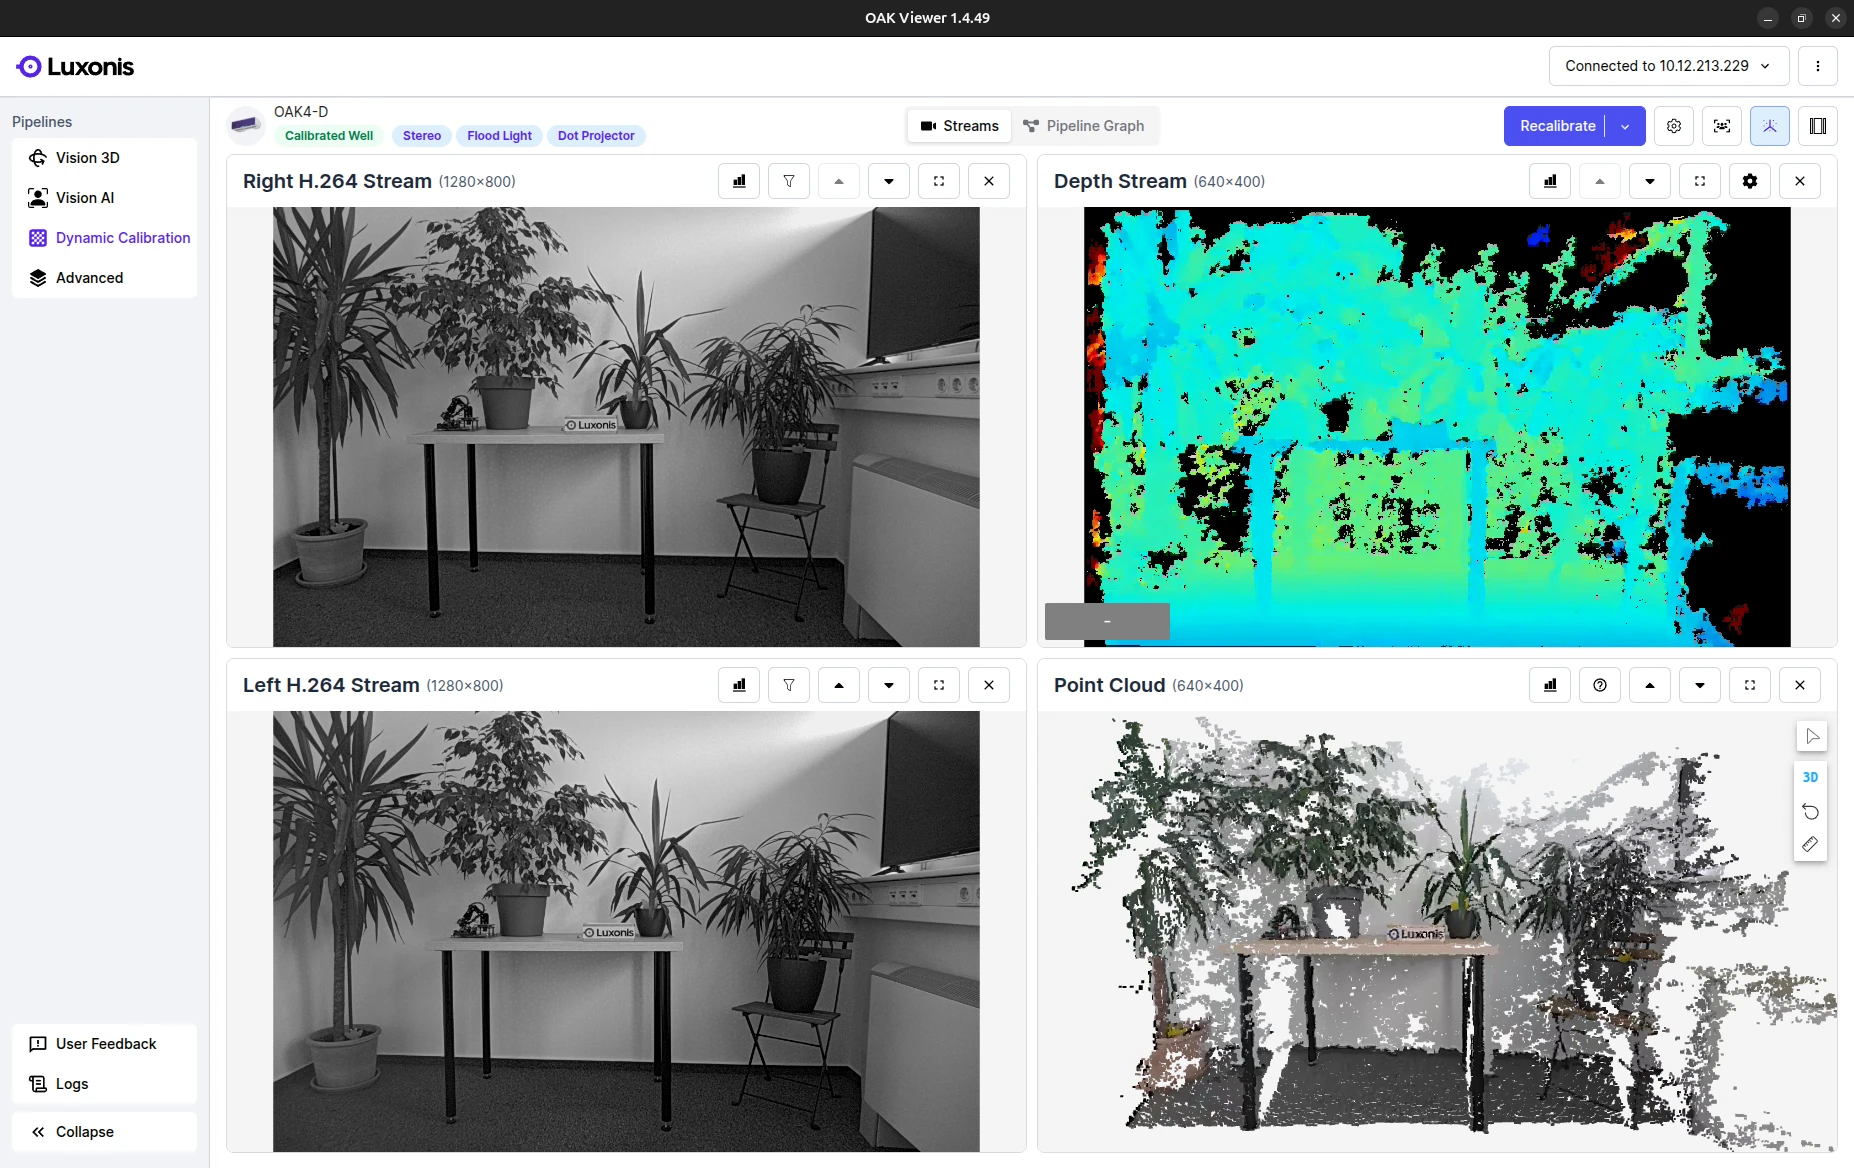
DepthAI library will look for all available devices inside the same LAN. If the camera is not on the same LAN, you can manually specify the IP address of the device. If DHCP server is not available, the camera will fallback to a static IP 169.254.1.222.The best way to test your device is by running the OAK Viewer. It's a GUI application that allows you to easily evaluate the camera by visualizing its output in real-time. If it finds the device and starts streaming frames, then the connection is working properly.
Debugging
If you are getting an error like RuntimeError: No available devices, it means that DepthAI couldn't find any PoE device on the same subnet. Make sure that the camera is powered on and connected to the same network as your computer. See the tabs below for debugging steps.We recommend using the latest depthai version before any kind of troubleshooting.
Different Subnet
The DepthAI library only searches for available OAK PoE cameras inside the same subnet. You can still ping the camera, but autodiscovery won't find the device. If the camera is not in the same subnet, you can manually specify the device IP, as shown in the code below.
Python
Py
1import depthai as dai
2pipeline = dai.Pipeline()3# ... Populate pipeline ...45# Define IP address of the device6device_info = dai.DeviceInfo("169.254.1.222")78with dai.Device(device_info)as device:9# Define queues, get messages...
C++
C++
1#include"depthai/depthai.hpp"23intmain(int argc,char** argv){4 dai::Pipeline pipeline;5// ... Populate pipeline ...67// Define IP address of the device8auto deviceInfo = dai::DeviceInfo("169.254.1.222");910 dai::Devicedevice(deviceInfo);1112// Define queues, get messages...13return0;14}
Multiple interfaces
When using PoE devices with a PC that is connected to both WiFi and Ethernet, network routing needs adjustment to avoid connectivity issues. A common problem is the system detecting the same PoE device twice, leading to initialization errors (RuntimeError: Failed to find device after booting, error message: X_LINK_DEVICE_NOT_FOUND).Quick Fix: Disconnect from WiFi to prevent duplicate device discovery.You can also manually configure network routing to ensure the DepthAI device communicates through PoE while maintaining internet access via WiFi:
Windows
Open Command Prompt: Press Win + R, type cmd, and press Enter to open Command Prompt.
Identify Network Adapters: Type ipconfig and press Enter. Note the names of your network adapters (e.g., Ethernet, Wi-Fi) and their IP addresses.
Add a Route:
Use the route command to add a persistent route to the DepthAI device. The general format is: route -p ADD [DepthAI-IP] MASK [Subnet-Mask] [Adapter-Gateway-IP].
Replace [DepthAI-IP] with the IP address of your DepthAI device, [Subnet-Mask] with the appropriate subnet mask, and [Adapter-Gateway-IP] with the gateway IP of the adapter you wish to use for DepthAI communication.
Verify the Route: After adding the route, you can verify it by typing route print and pressing Enter.
Linux
Open Terminal: You can find the Terminal application in the applications menu or use the shortcut Ctrl + Alt + T.
Identify Network Interfaces: Type ip addr and press Enter. Note the names of your network interfaces (e.g., eth0 for Ethernet, wlan0 for Wi-Fi).
Add a Route:
Use the ip route command to add a route to the DepthAI device: sudo ip route add [DepthAI-IP]/24 via [Adapter-Gateway-IP] dev [Network-Interface].
Replace [DepthAI-IP] with the IP address of your DepthAI device (make sure the mask - 24 - is correct), [Adapter-Gateway-IP] with the gateway IP of the adapter you wish to use for DepthAI communication, and [Network-Interface] with the name of the network interface.
Verify the Route: You can check the route by typing ip route show and pressing Enter.
Make sure to replace the values in brackets with the appropriate values for your system. Default settings for DepthAI devices (when disconnected from a DHCP server) are specified in No DHCP panel above.More info on routing/making routes persistant can be found here: Windows, macOS, Ubuntu.
macOS
Open Terminal: You can find Terminal in Applications under Utilities, or use Spotlight to search for it.
Identify Network Interfaces: Type ifconfig and press Enter. Note the names of your network interfaces (e.g., en0 for Ethernet, en1 for Wi-Fi).
Add a Route:
Under network settings -> set service order, drag the interface used for DepthAI to the bottom of the list.
Direct the relevant traffic to the DepthAI adapter: sudo route add -net 169.254 -interface [dongle-interface].
Replace [dongle-interface] with the DepthAI network interface.
No DHCP
By default, PoE devices will try to get a dynamic IP address from DHCP server. However, if there's no DHCP server on the network, devices will fall back to their static IP 169.254.1.222. In this case, you can either:
Connect the switch to a router, to get a dynamic IP address from the DHCP server.
Set static IP of your computer (eg. 169.254.1.10, netmask: 255.255.0.0) to be in the same subnet as the PoE device, and then connect to your device.
Manually specify device IP address when connect to it, you can use either IP address or MxId:
Python
Py
1import depthai as dai
2pipeline = dai.Pipeline()3# ... Populate pipeline ...4device_info = dai.DeviceInfo("169.254.1.222")5# device_info = depthai.DeviceInfo("14442C108144F1D000") # MXID6# device_info = depthai.DeviceInfo("3.3.3") # USB port name78with dai.Device(device_info)as device:9# Define queues, get messages...
C++
C++
1#include"depthai/depthai.hpp"2intmain(int argc,char** argv){3 dai::Pipeline pipeline;4// ... Populate pipeline ...5auto deviceInfo = dai::DeviceInfo("169.254.1.222");6// auto deviceInfo = dai::DeviceInfo("14442C108144F1D000");7// auto deviceInfo = dai::DeviceInfo("3.3.3");8 dai::Devicedevice(deviceInfo);9// Define queues, get messages...10return0;11}
Multiple devices
If you are using multiple PoE devices, option 2 and 3 won't work, as all devices will try to use the same IP address. If that is the case, you will need to assign static IP addresses to your PoE devices, see set static IP.
Firewall
UDP Device discovery is handled on port 11491 and TCP XLink connection is handled on port 11490.On Ubuntu by default the firewall is disabled, so you shouldn't have any issues. You can check this though by executing the following command:
Command Line
1>sudo ufw status
2Status: inactive
If you have your firewall enabled, you might need to allow these two ports:
We have noticed that the above rules don't always work as expected, and it's sometimes necessary to run the command below. For production environment, you would want to set static IP on your OAK PoE camera, otherwise it could change and you would need to re-set the firewall rules.
Command Line
1ufw allow from [OAK_POE_IP]
Network equipment
We have noticed that with certain network equipment, our default 15 seconds timeout for connecting to the POE device is insufficient, and needs to be increased. You can increase the timeout by using environmental variable (values in milliseconds).
VPN connectivity could also disrupt the connection with the PoE device (as your computer may be searching only the remote network for the device, so would be unable to discover it on the local network), so we suggest turning the VPN off when using the PoE devices or otherwise ensuring that your local routing is setup such that local devices are usable/discoverable while VPN connectivity is active.
After successfully connecting to the device and uploading the pipeline, the connection should be stable, there should be minimal latency (below 1sec), and the bandwidth should be 700 Mbps.
Debugging
Connection drop
If the connection drops after a period of time, there are a few potential issues that could be causing it.
Network issue
Due to the network and networking equipment, OAK PoE cameras might drop the connection after running as expected for a few hours or a few days. There are 2 potential solutions/workarounds for this issue:
Decrease the network load, so the connection doesn't drop. This can be achieved by decreasing the FPS of the camera, or by decreasing the resolution of the camera.
Auto-reconnect if the camera drops connection. We have a demo here that does that. The downside is that the reconnection can take up to about 30 seconds. First, the watchdog has to kick in and reset the camera (~5sec). Then, the bootloader has to reboot on the camera so it's accessible again (~5sec). And finally, the host computer has to initialize a new connection and transfer the firmware, the pipeline, and all assets (NNs) to the camera, so it can boot up the pipeline (application). We have auto-reconnection example here.
Device crash
Device could crash due to a bug in the firmware, or in the user's application.
Use the latest bootloader/DepthAI!
Make sure you are using the latest DepthAI version, and have the latest Bootloader flashed on the device, as there may have been some bug fixes in latest versions.
If there was a firmware bug or (user-defined) pipeline issue, a Crash report will get generated, which you should send over to us (support@luxonis.com).If no crash report was found when running the script linked above, it means that either it's a power issue, or connection dropped (or, less likely, a hardware issue).Alternatively, with depthai 2.28.0, automatic crash report generation is enabled by default. This will send the crash report to Luxonis servers and will include:
crash dump itself
pipeline configuration
depthai version
host operating system version (MacOS/Linux/Windows)
It does not include any user data, images or NN models. It does however include the Script node code. If you wish to disable automatic crash report generation, you can do so by setting the environment variable DEPTHAI_DISABLE_CRASHDUMP_COLLECTION to 1.
Power issue
If your PoE device does not work, or in some rare cases, it works for a period of time and then suddenly stops working, there might be an issue with your PoE switch/injector. For example, when the power budget per port seems to be sufficient, but the overall power budget for the switch is being exceeded due to demands from devices on other ports. It is worth checking the specifications of your PoE switch / injector with respect to its overall power budget.
High CPU usage
If the CPU of the PoE device is constantly around 100% (on LeonOS core), there's a good chance that the device will drop the connection sooner or later and throw an error like ping was missed, closing the device connection. You can read more about device CPU usage (and how to debug it) on this documention.
Low speed / High latency
If you noticed low FPS or high message latency you should check the following:
PoE Link test - You should get speed 1000 (Mbps). If it's 100, it likely means you are using Slow networking equipment (see below)
OAK Latency test - Should be below 10ms, but it depends on your network
If you get lower bandwidth/latency as expected, you should check debugging steps below. We also have non-PoE-related Low Latency documentation.
Slow networking equipment
If your PoE link speed is below 1000 Mbps, there may be a bottleneck in your setup:
Ethernet Cable: Use Cat5e or higher. While Cat5e supports 1 Gbps, Cat5 is limited to 100 Mbps. It might also be that your cable is damaged, and only 2 pairs are working (up to 100Mbps)
PoE Switch: Ensure it supports 1 Gbps speeds. Such switches are usually labeled 10/100/1000 Mbps.
Router: If applicable, ensure it can handle 1 Gbps. Some routers might have limited ports with this capability.
PoE Injector: Ensure it supports 1 Gbps. Some models are limited to 100 Mbps.
Cable Length: Keep your Ethernet cable under 100 meters (328 feet). For longer distances, use a PoE extender.
Host Network Card: Ensure it supports 1 Gbps. Older cards might be capped at 100 Mbps. If necessary, upgrade your network card.
Do not use WiFi to connect to the PoE device. WiFi is not designed for high bandwidth applications, and will likely result in a bottleneck. If you must use it, use WiFi standards supporting at least 1 Gbps such as 802.11ac (WiFi 5), 802.11ax (WiFi 6), or 802.11ay (WiFi 6E). Note that bandwidth diminishes with distance and obstructions between the router and host.
NIC settings
Some default Network Interface Card (NIC) settings on Linux might not be ideal for communication with OAK POE cameras, which can result in slow FPS, high latency, and/or high OAK CPU usage. You can use ethtool to configure these settings.ethtool settings that provided better performance for usIn one case configuring sudo ethtool -C NAME rx-usecs 1022 (where NAME was enp59s0f1) improved FPS from 12 to 20.
Advance network settings
For advance users only! Luxonis does not provide support for these settings.
For more advance users we have exposed some network settings that allows you to fine-tune the system for better performance. You can configure them with the device config object.For RVC2sysctl configuration, see available settings here (note that some settings are read-only, and some might crash the system). Please refer to FreeBSD's documentation (12.0) for more information on sysctl settings.
Py
1config = dai.Device.Config()2config.board.network.mtu =9000# Jumbo frames. Default 15003config.board.network.xlinkTcpNoDelay =False# Default True4config.board.sysctl.append("net.inet.tcp.delayed_ack=1")# configure sysctl settings. 0 by default.56with dai.Device(config)as device:7# Your code here
PoE Extender
We have tested the power/communication with this PoE extender. It's a 1Gbps extender that accepts PoE+ (30W) and has 2x PoE (15W) port outputs, so you can connect two OAK PoE cameras to it.We were able to stream a video from both devices simultaneously.
WiFi Bridge
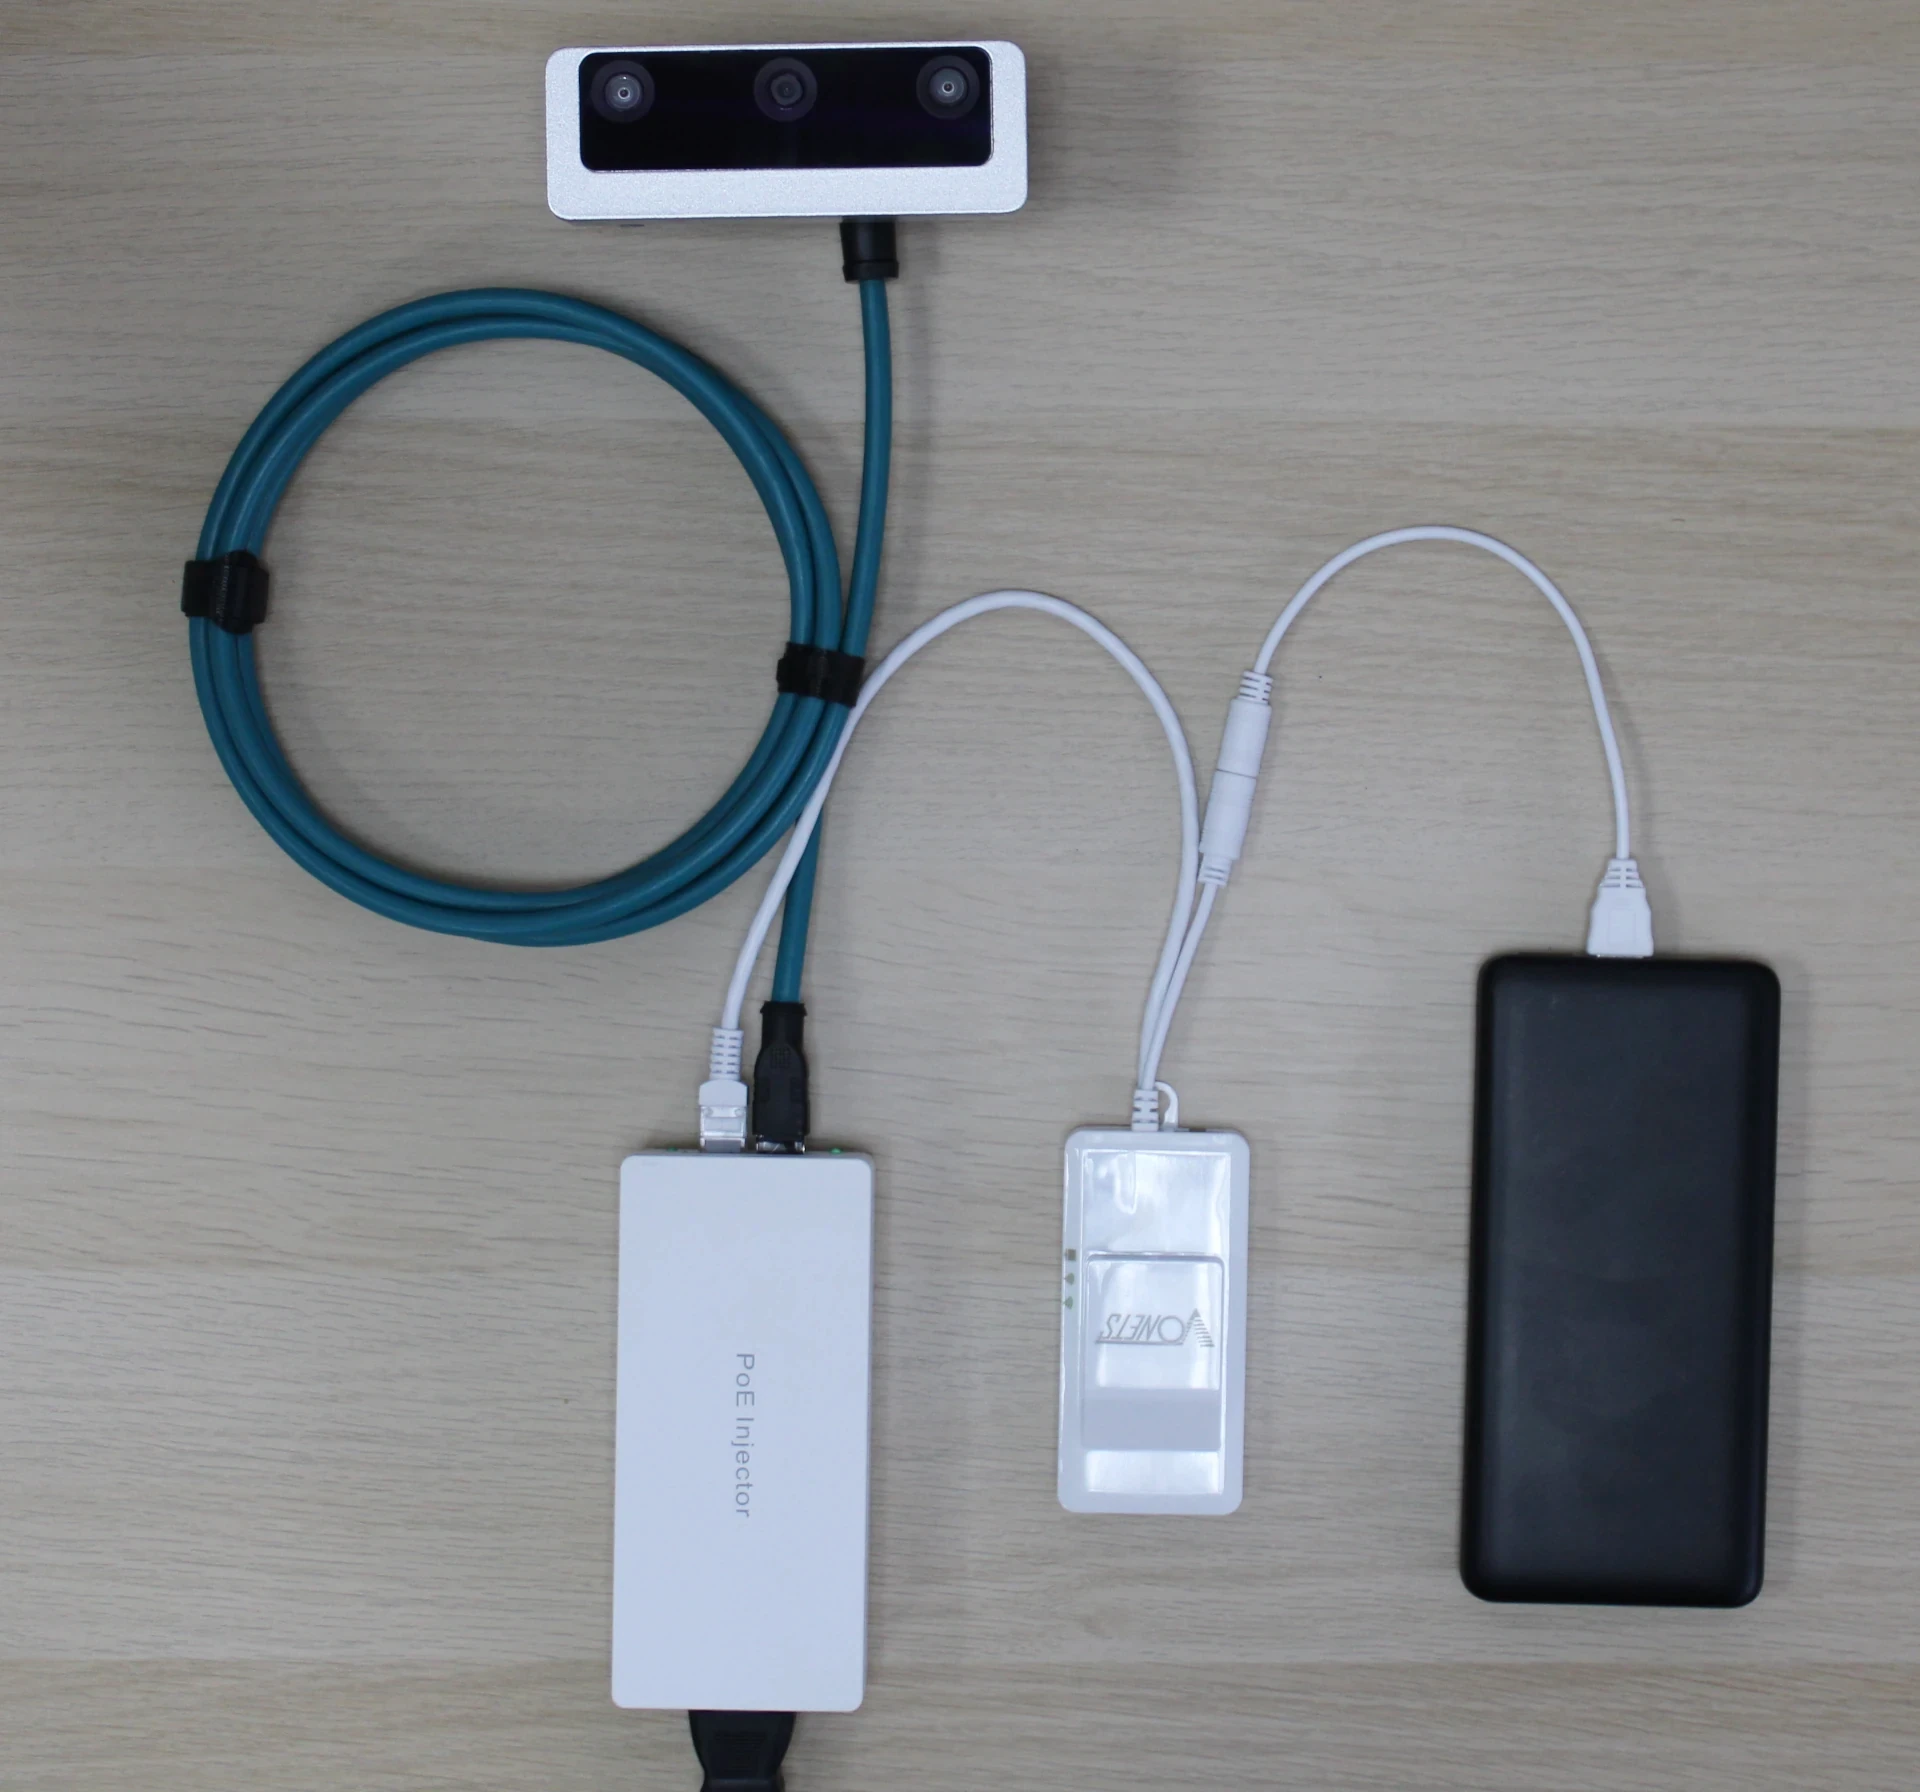
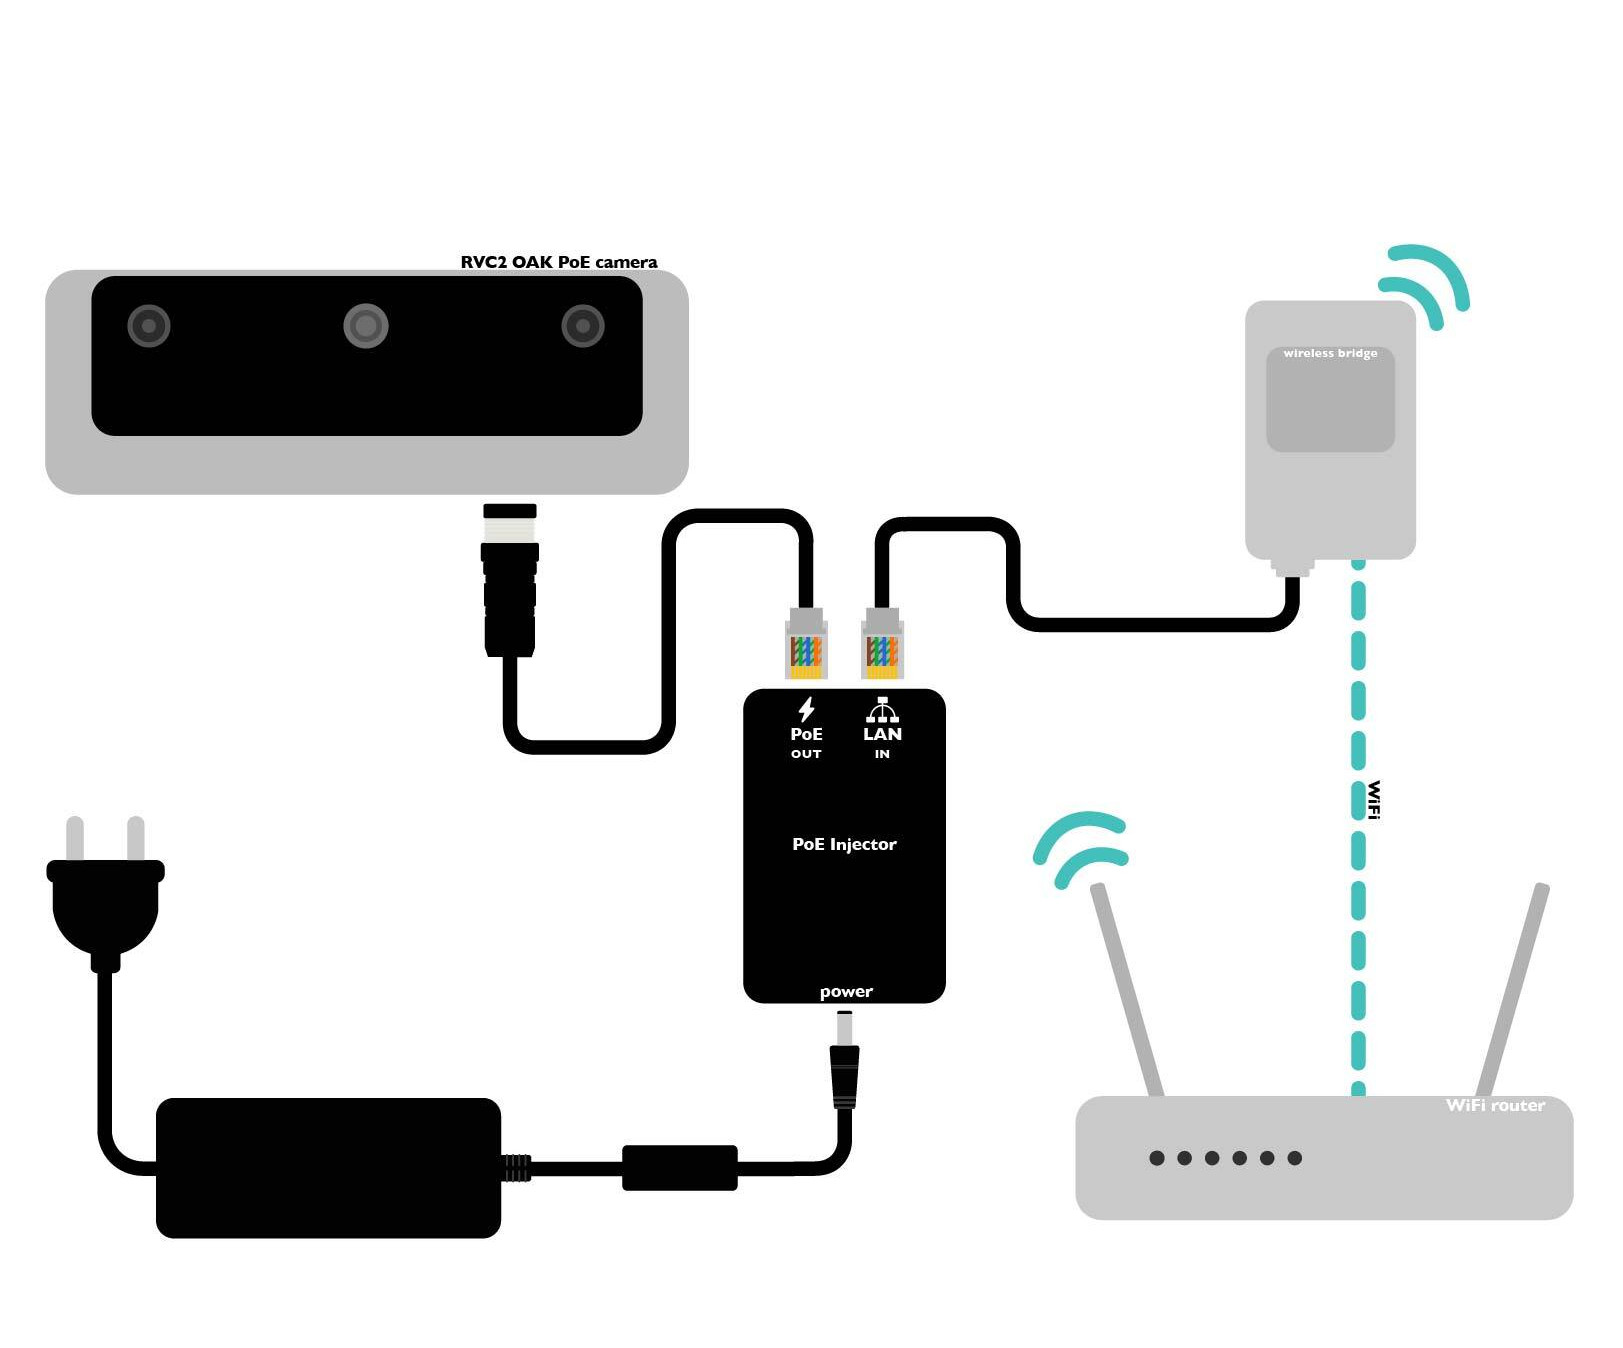
One option to connect the PoE device to the network is to use a WiFi bridge. This is useful when you don't have a PoE switch or injector, but you have a WiFi network available. The bridge will connect to the WiFi network and provide an ethernet port (connectivity) to your OAK PoE device. We have tested the Vonets WiFi Bridge and it works as expected.You first need to connect to the WiFi bridge (eg. via your phone) and configure it to connect to your WiFi network. Then you can connect the OAK PoE device (via PoE injector) to the bridge.
This WiFi bridge accepts 5V for power, you can use either USB-A connector (we connected that to a powerbank), or a standard barrel connector.
Video streaming with OAK
Because an OAK PoE camera is connected to the network, it can stream video feed directly to a computer. Here are some video streaming demos that use Script node on OAK PoE cameras:
TCP streaming using Script node - either TCP server or client
MQTT publishing using Script node (both pub/sub should work)
Below are some demos which stream video feed from OAK camera via XLink to the host computer and then stream it from the host computer to another computer/server, which can also work with any other OAK camera (even USB OAK devices):
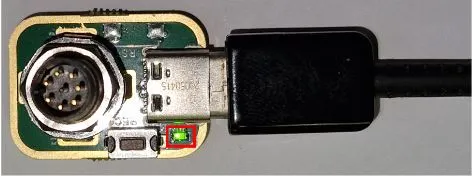
In case you can ping the device but can't connect to it in any way (search for the device, specifying IP), you should do a factory reset as the device might have been soft-bricked. This usually happens with older bootloader versions. Note that only OAK-D-PoE and OAK-1-PoE have a USB-C connector, while OAK-D Pro PoE has USB connectivity via M8 connector.
Change DIP switch back to 0x3 (switches 5,6 up, others down) for PoE communication.
Close back the enclosure, making sure the gasket is in the correct place (for waterproofing).
Series 2 PoE devices (M8 connector)
Due to the S2 OAK PoE devices not having any physical buttons on the enclosure (as a result of their IP rating), the programming board is used to re-flash the firmware on your PoE device. This is particularly useful when the static IP of the device is set to a different subnet and cannot be accessed. You will need the OAK Programming board to re-flash the firmware and restore the device to its default settings.Steps:
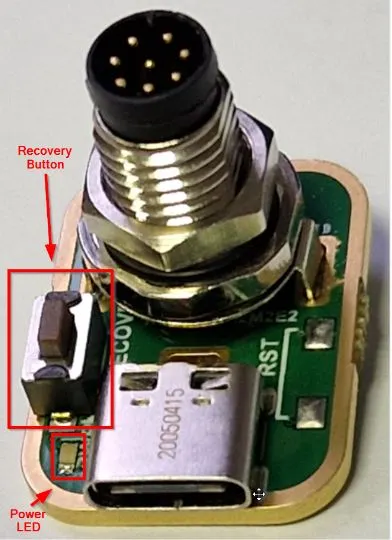
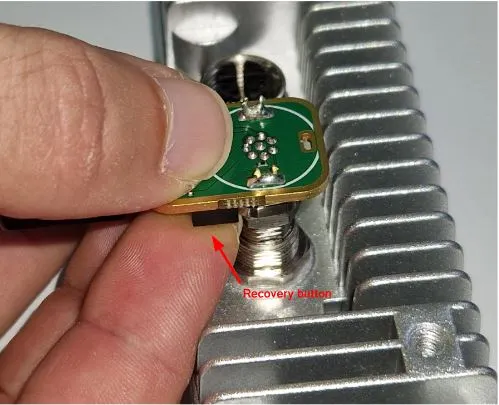
Connect the programming board to the M8 connector of your OAK POE device. Make sure the orientation is correct (as shown in the image below) to avoid damage to the M8 connector. The programming board connector does not screw or lock on the POE connector, and thus care must be taken that the connector does not fall out of the socket while flashing.
Press and hold the Recovery button on the programming board while simultaneously connecting it to a USB port on your host device (the device from which you will flash the firmware). The LED on the programming board should light up when connected properly. When the programming board is connected with the host computer you can release the Recovery button.
Once connected, you should be able to discover your PoE device on your host computer.
You can now proceed to re-flash the firmware the same way as for other OAK devices with the Device Manager tool, which provides a GUI for multiple operating systems. The tool includes a "Factory Reset" option that allows you to reset your Series 2 OAK PoE device to its default settings.
After successfully deploying the device, you can use the following resources to learn more about the software ecosystem: