Conversion
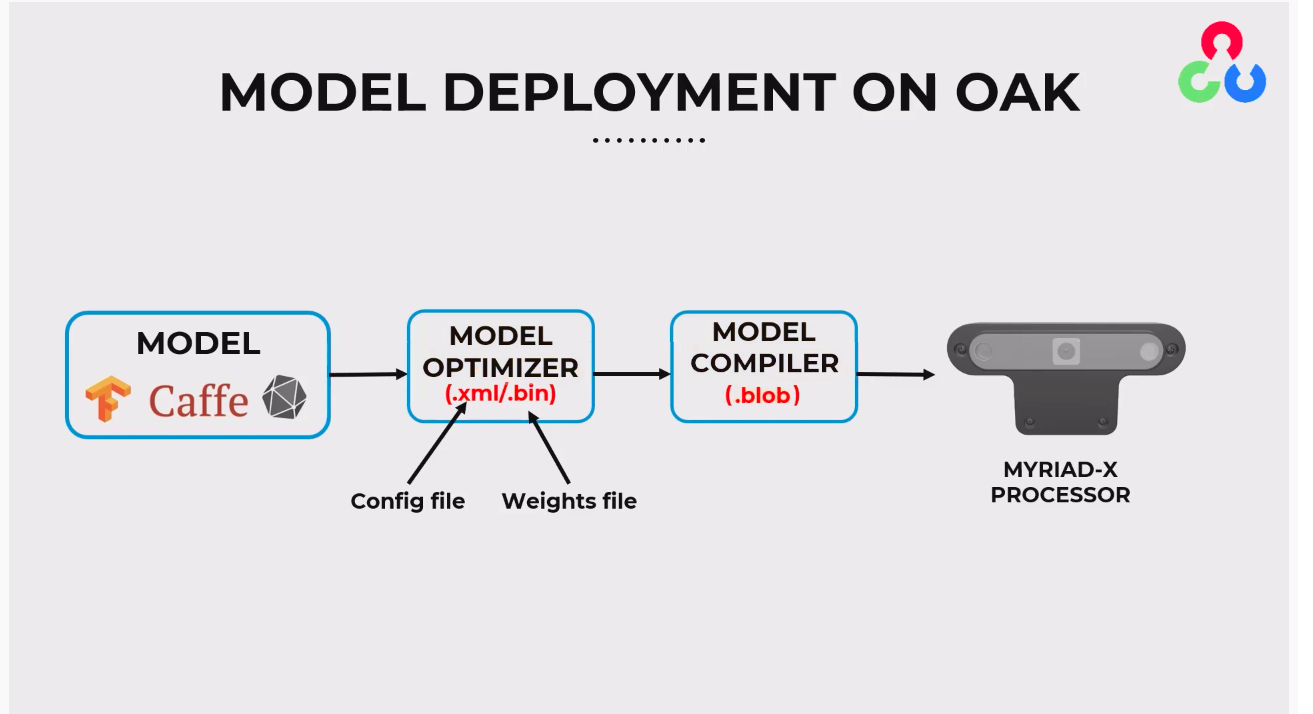
- Model Source: Begin with a model developed in a framework such as ONNX, Caffe, or one of the TensorFlow formats.
- Model Optimizer: Use the Model Optimizer to convert the model into OpenVINO's Intermediate Representation (IR), resulting in
.xml(configuration file) and.bin(weights file). - Model Compiler: Take the
.xmland.binfiles and compile them using the Model Compiler to create a.blobfile. - Deployment: Deploy the
.blobfile onto the MYRIAD-X processor within an OAK device for inference.
Model Source Preparation
PyTorch to ONNX
Python
1import torch
2# Load your PyTorch model
3your_model = Model()
4# Create a dummy input tensor matching the input shape of the model
5dummy_input = torch.randn(1, 3, 224, 224)
6# Convert and save as ONNX
7torch.onnx.export(your_model, dummy_input, 'output.onnx')
TFLite to ONNX
.tflite) format, the recommended conversion tool is tflite2onnx. This tool converts TFLite models to the ONNX format:- Firstly, install the
tflite2onnxpackage:
Command Line
1pip install tflite2onnx- Then the conversion can be done via the command line:
Command Line
1tflite2onnx your_model.tflite output.onnxPython
1import tflite2onnx
2tflite2onnx.convert('your_model.tflite', 'output.onnx')
Other TensorFlow representations
.blob file.Obtaining Blob
.blob file: the first and the easiest method is using BlobConverter, which is also recommended. Alternatively, you use the local method, which involves directly utilizing OpenVINO tools.Using BlobConverter
.blob file. This tool is accessible through a web interface, an API, and a command-line interface (CLI). The following sections outline the steps for using each of these tools to convert your model into .blob.Conversion via BlobConverter Web Interface
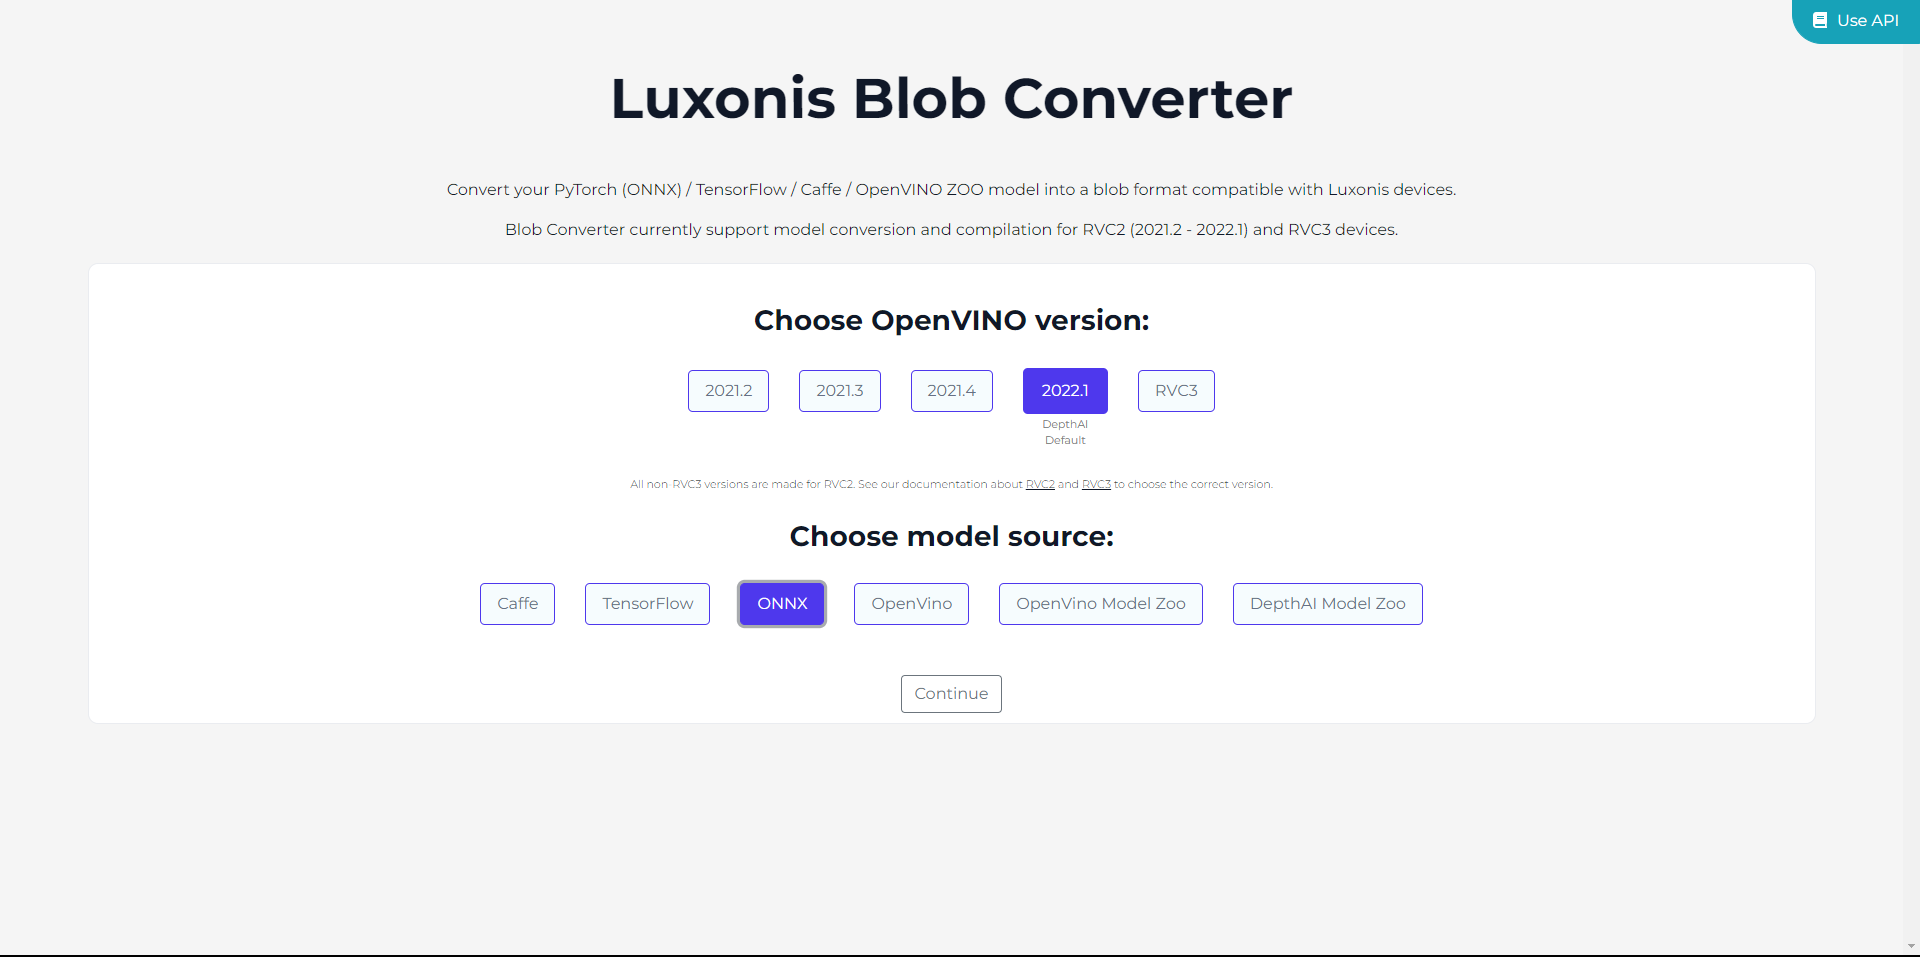
- Go to the BlobConverter website.
- Select the OpenVINO version you wish to utilize. We will be using the latest version supported by BlobConverter, which is currently
2022.1. For RAE and other devices with RVC3, you can simply pick RVC3. After choosing the version, indicate the model source. In our case, the ONNX Model, but it is also possible to upload your model in the IR format. Then click onContinue.
- Upload the ONNX file by clicking on
Choose file.
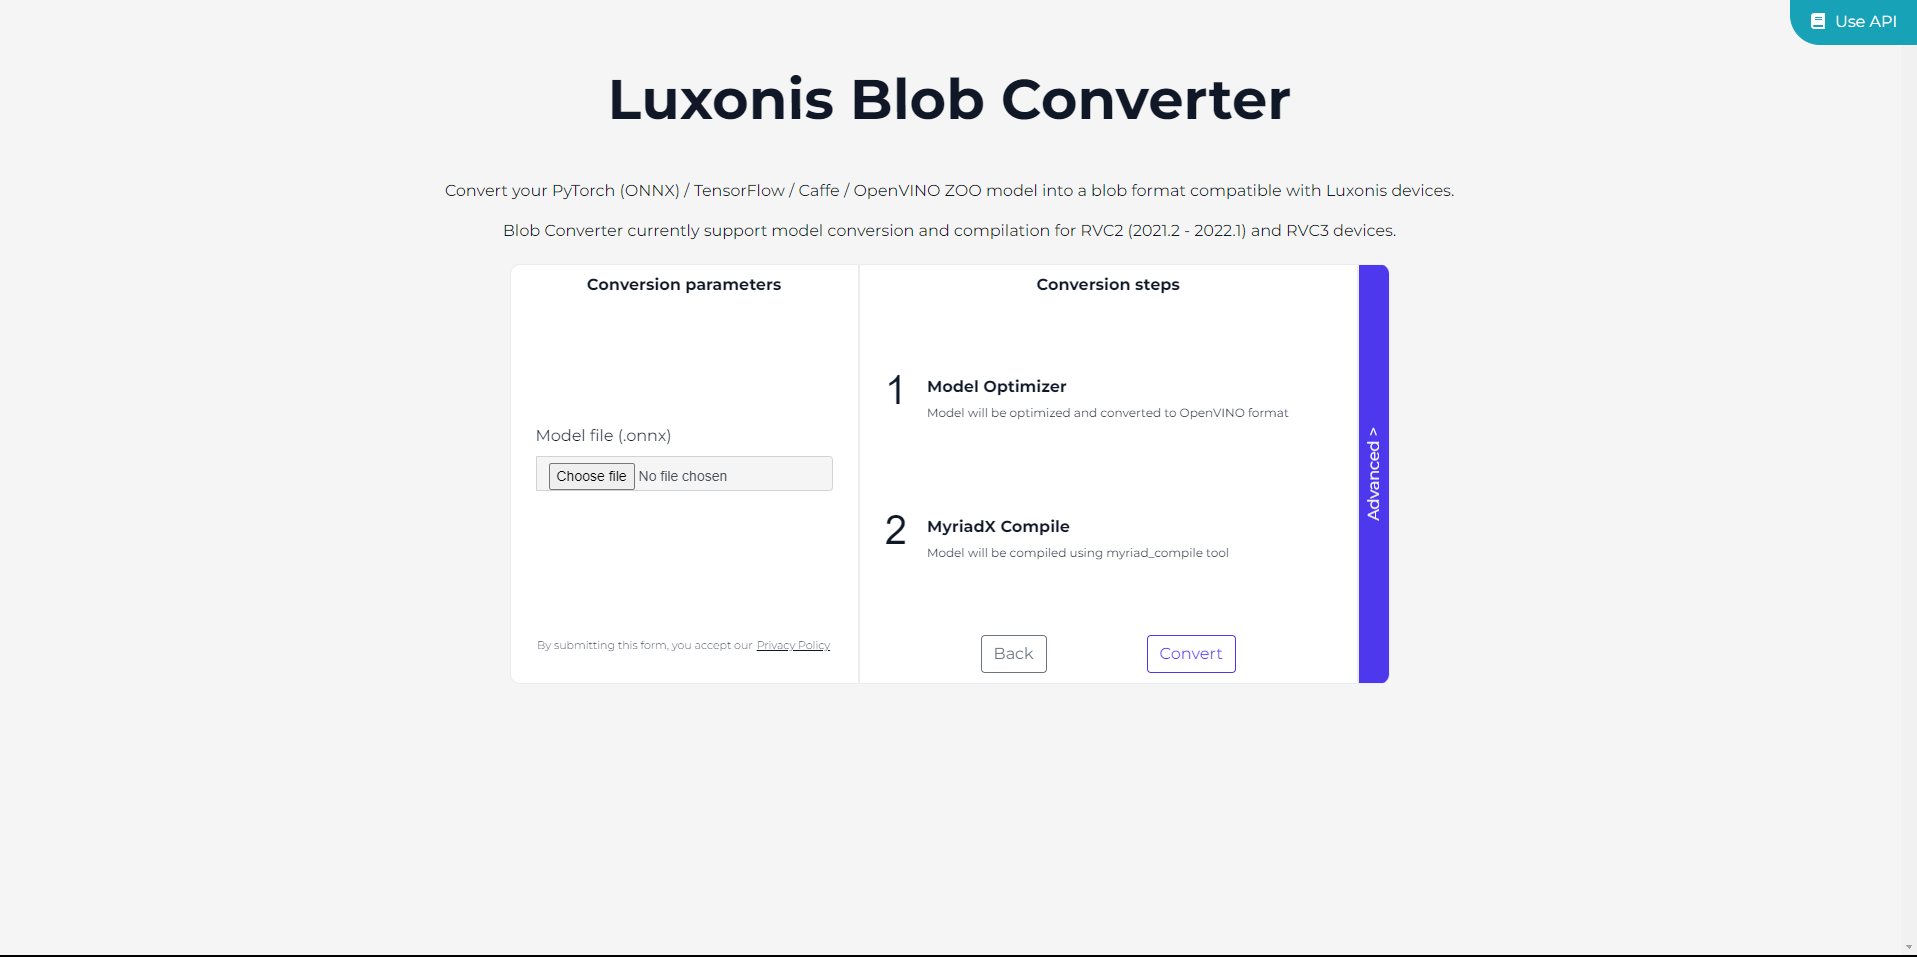
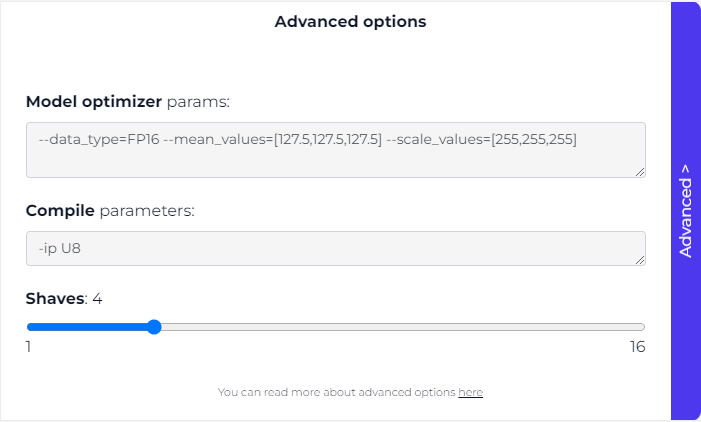
- Additionally, before proceeding with the model conversion, you can customize conversion parameters by clicking on
Advanced.
- Finally, click on
Convertand simply wait until the process is finished.
Use API button at the top right corner of the website.Note: The BlobConverter tool can also be self-hosted. For guidance on this process, please refer to the instructions available in our BlobConverter repository.
Conversion via BlobConverter CLI
- First, install the BlobConverter CLI:
Command Line
1python3 -m pip install blobconverter- Using the package, you can convert your model both from the command line and from the Python script directly:
Command Line
1python3 -m blobconverter --onnx-model /path/to/model.onnx --shaves 6Python
1import blobconverter
2
3blob_path = blobconverter.from_onnx(
4    model="/path/to/model.onnx",
5    data_type="FP16",
6    shaves=6,
7)
Local Conversion
.blob file using your own system. It's particularly useful in settings with limited internet access or for integrating the conversion into your workflow. The upcoming steps will guide you through this process using tools like OpenVINO's Model Optimizer and Compile Tool.Model Optimizer
.bin and .xml). This standardized model format can be deployed on various Intel devices, including VPU. Moreover, you can customize the conversion process by specifying various flags, which we will explain in the upcoming sections.To perform the conversion, ensure you have OpenVINO-dev installed. Please keep in mind that this method supports OpenVINO version 2022.1 and does not include support for later versions:Command Line
1pip install openvino-dev==2022.1Command Line
1mo --input_model path/to/model.onnx --data_type=FP16 --mean_values=[0,0,0] --scale_values=[255,255,255]Compile Tool
.blob file, which is then ready for deployment on the device.- The Compile Tool is part of the OpenVINO toolkit. Its location will depend on your installation path. Typically, it's found in the
.../tools/compile_tooldirectory of your OpenVINO installation:
Command Line
1cd .../tools/compile_tool- Use the following command format to compile your IR model into a .blob file:
Command Line
1./compile_tool -m path_to_model/model_name.xml -d MYRIADIt's worth mentioning that while our platform supports a broad range of models, some custom or unique models might need extra steps to work perfectly due to certain operator limitations. For a smooth experience, check out the list of operators supported by OpenVINO
Advanced Settings
Model Optimizer Flags
Data Type
--data_type=FP16. For OpenVINO version 2022.3 and later, the parameter --compress_to_fp16 should be utilized instead. You can find additional details here.Mean and Scale Values
--mean_values and --scale_values. By default, frames from ColorCamera/MonoCamera are in U8 data type, ranging from [0,255].However, models are typically trained with normalized frames within the range of [-1,1] or [0,1]. To ensure accurate inference results, frames need to be normalized beforehand.Although creating a custom model that normalizes frames before inference is an option (example here), it is more efficient to include this normalization directly within the model itself using the flags during model optimizer step.Here are some common normalization options (assuming that the initial input is in the range of [0,255]):- For required input with values between 0 and 1, use mean=0 and scale=255, computed as
([0,255] - 0) / 255 = [0,1]. - For required input with values between -1 and 1, use mean=127.5 and scale=127.5, computed as
([0,255] - 127.5) / 127.5 = [-1,1]. - For required input with values between -0.5 and 0.5, use mean=127.5 and scale=255, computed as
([0,255] - 127.5) / 255 = [-0.5,0.5].
Model Layout
--layout parameter. For example:Command Line
1--layout NCHW- N - batch size
- C - channels
- H - height
- W - width
[NeuralNetwork(0)] [warning] Input image (416x416) does not match NN (3x416)It's important to note that the ColorCamera node typically outputs preview frames in the Interleaved / HWC layout by default, which is native to OpenCV. However, you have the option to switch it to the Planar / CHW layout through the API:Python
1import depthai as dai
2pipeline = dai.Pipeline()
3colorCam = pipeline.createColorCamera()
4colorCam.setInterleaved(False) # False = Planar layoutColor Order
--reverse_input_channels flag is utilized.Moreover, there is an option to switch the camera output to RGB via the API, eliminating the need for the flag:Python
1import depthai as dai
2pipeline = dai.Pipeline()
3colorCam = pipeline.createColorCamera()
4colorCam.setColorOrder(dai.ColorCameraProperties.ColorOrder.RGB) # RGB color order, BGR by defaultModel Compiler Flags
Input Layer Precision
-ip U8 will incorporate a conversion layer U8->FP16 on all input layers of the model, which is typically the desired configuration. However, in specific scenarios, such as when working with data other than frames, using FP16 precision directly is necessary. In such cases, you can opt for -ip FP16, as demonstrated in the Cosine distance model example.Shaves
Export Example
.blob file for deployment on OAK devices. We will use torchvision for accessing the pre-trained version of the model.For converting YOLO models, consider using our specialized tool designed for this task. For detailed guidance on the YOLO conversion process, please visit this documentation page.
1
Exporting the Model to ONNX
First, we will export the ResNet18 model from PyTorch to the ONNX format.Parameters Explanation:
Python
1import torch
2import torchvision.models as models
3
4# Load the pretrained ResNet18 model from torchvision
5resnet18 = models.resnet18(pretrained=True)
6
7# Set the model to evaluation mode
8resnet18.eval()
9
10# Create a dummy input tensor matching the input shape of the model
11dummy_input = torch.randn(1, 3, 224, 224)
12
13# Export the model to an ONNX file
14torch.onnx.export(
15    resnet18,
16    dummy_input,
17    'resnet18.onnx',
18    export_params=True,
19    opset_version=11,
20    input_names=['input'],
21    output_names=['output']
22)export_params: This flag ensures that the trained parameters are exported along with the model structure.opset_version: Specifies the ONNX version to use. While we typically use version 11 to ensure compatibility with ResNet18's requirements, higher versions could also be applicable.input_namesandoutput_names: We use these flags to name the model's input and output nodes for clarity. In our example, the input node is named "input" and the output node "output".- After exporting, you'll get a file named "resnet18.onnx" as defined in the third argument.
2
Convert ONNX to .blob Using BlobConverter
Instead of manually converting the ONNX file to OpenVINO IR and then compiling it, we'll use BlobConverter to handle both steps.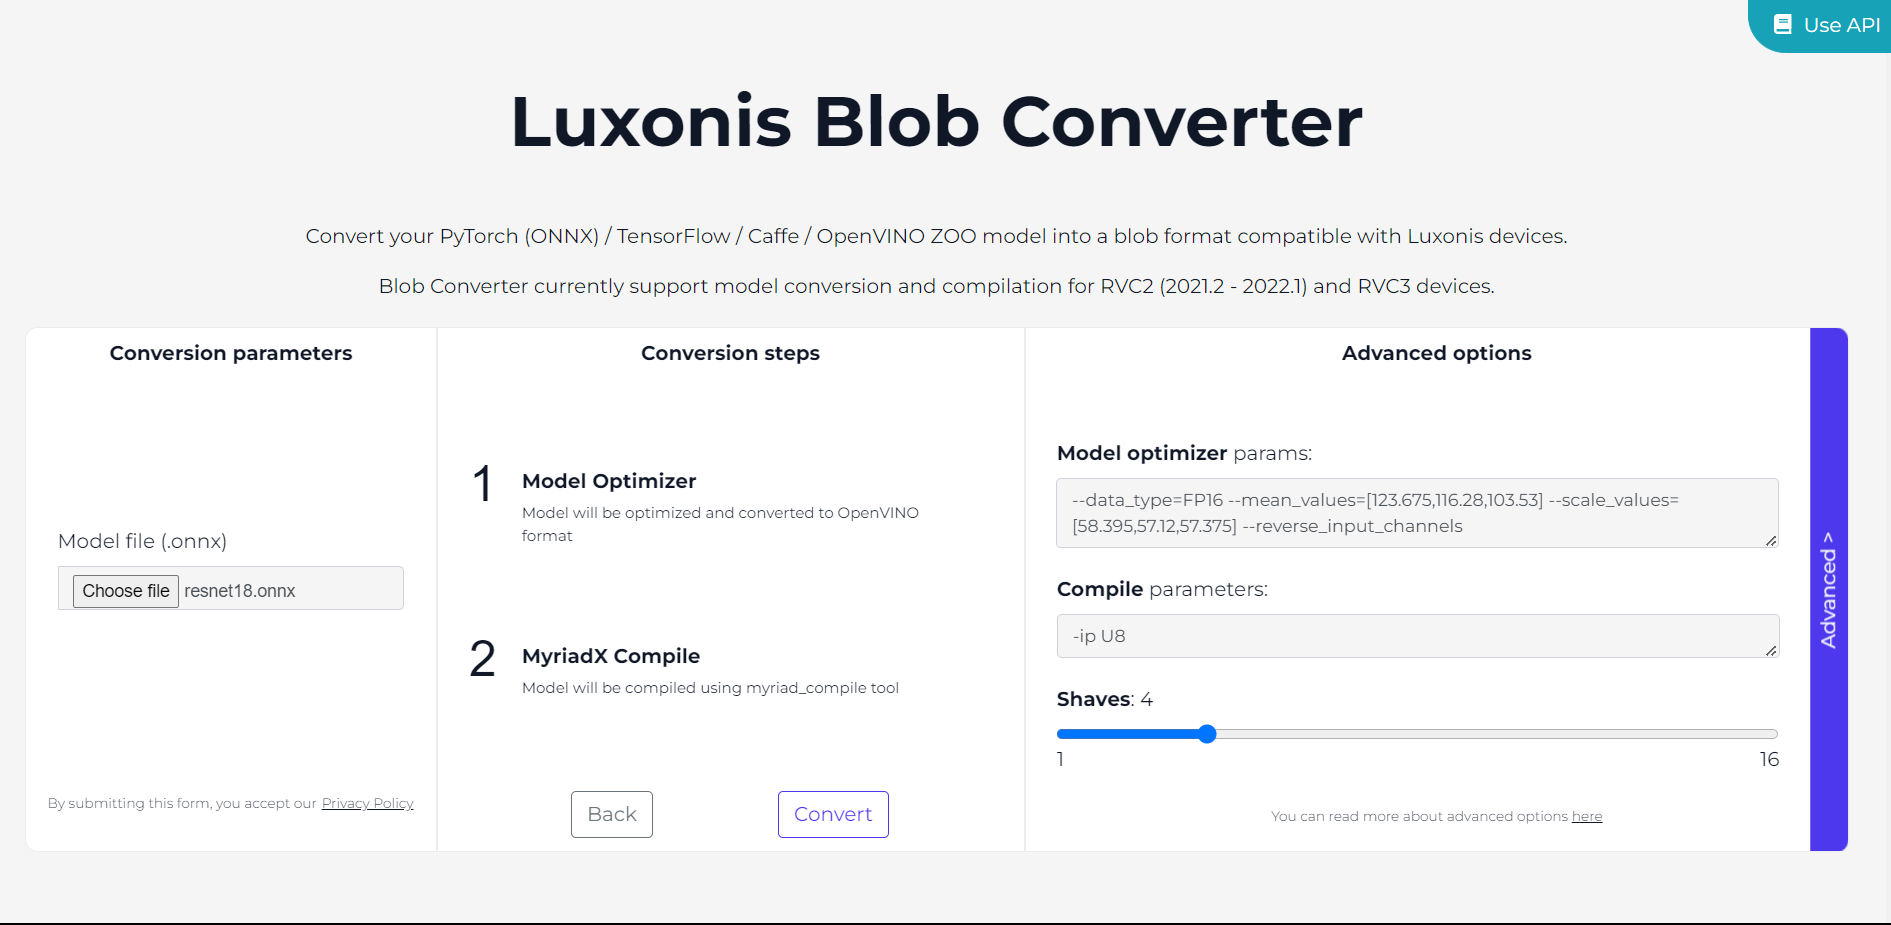
- Go to the BlobConverter website.
- Choose the appropriate OpenVINO version, which for this example, is
2022.1. - Upload the
.onnxfile and enter any necessary Model Optimizer parameters in the 'Advanced' settings. --data_type: Set to 'FP16' for compatible precision with the VPU processor.--mean_values: Set to [123.675, 116.28, 103.53]. These values correspond to the average of the red, green, and blue channels across all images in the ImageNet dataset (on which ResNet18 was trained).--scale_values: Set to [58.395, 57.12, 57.375] which are the standard deviations of each channel. This scaling ensures that the range of pixel values in the input image matches the range in the training data, which is important for the model to perform correctly.--reverse_input_channels: Use this flag to switch from BGR to RGB, since the ColorCamera node outputs frames in the BGR format, and the model requires RGB images.- So at the end, the flags should look like this:
Command Line
1--data_type=FP16 --mean_values=[123.675,116.28,103.53] --scale_values=[58.395,57.12,57.375] --reverse_input_channels- Click
Convertto start the conversion and then download the.blobfile once the process is completed.
resnet18.blob file that is ready for inference on OAK devices. The converted model will expect images in the BGR format with pixel values ranging from 0 to 255. Then these will be scaled to a range of 0 to 1 and normalized using the flags we set.