Deploying Custom Models
This tutorial will review the process of deploying a custom trained (or pre-trained) model to the OAK camera. As mentioned in details in Converting model to MyriadX blob tutorial, you first need to convert the model to OpenVINO’s IR format (.xml/.bin) and then compile it to .blob in order to then deploy it to the OAK camera.
1. Face mask recognition model
For our first tutorial we will deploy the SBD_Mask classification model, as it already has pre-trained .onnx model in the /models folder.
From the examples in the repo you can see that they are using CenterFace face detection model, and then SBD_Mask classification model to recognize whether the person (more specifically the face image) is wearing a mask.
Converting to .blob
Since the .onnx model
is already provided, we don’t need to export the trained model (to eg. frozen TF model). After downloading the model,
we can use blobconverter app to convert it to .blob. I will be using the latest
version of OpenVINO (2021.4 as of time of writing), and I can select ONNX Model as the source. After clicking the Continue
button, we can drag&drop the .onnx file to the Browse... button.
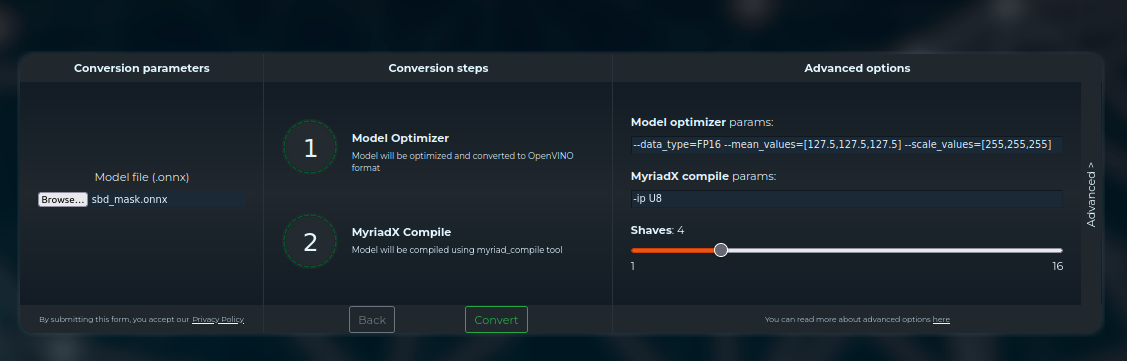
Before we click Convert, we should double-check the default values for Model Optimizer and Compile params.
Model optimizer parameters
Model Optimizer converts other model formats to OpenVINO’s IR format, which produces .xml/.bin files.
To decide Model Optimizer parameters, we could either read the repository to find out the required input values, or read the code:
def classify(img_arr=None, thresh=0.5):
    blob = cv2.dnn.blobFromImage(img_arr, scalefactor=1 / 255, size=(csize, csize), mean=(0, 0, 0),
                                swapRB=True, crop=False)
    net.setInput(blob)

    heatmap = net.forward(['349'])
    match = m_func.log_softmax(torch.from_numpy(heatmap[0][0]), dim=0).data.numpy()
    index = np.argmax(match)

    return (0 if index > thresh else 1, match[0])
These few lines actually contain both logic for decoding (which we will use later) AND contain info about the required
input values - scalefactor=1 / 255 and mean=(0, 0, 0), so the pretrained model expects 0..1 input values.
For Model Optimizer we will use the arguments below. See Model Optimizer docs here for more info.
--data_type=FP16 --mean_values=[0,0,0] --scale_values=[255,255,255]
Myriad X compile parameters
After converting the model to OpenVINO’s IR format (.bin/.xml), we need to use Compile Tool
to compile the model to .blob, so it can be deployed to the camera.
Compiling the model
Now that we have set arguments to the blobconverter, we can click Convert. This will upload the .onnx model
to the blobconverter server, run the Model optimizer and Compile tool, and then the blobconverter app will prompt us to save
the .blob file.
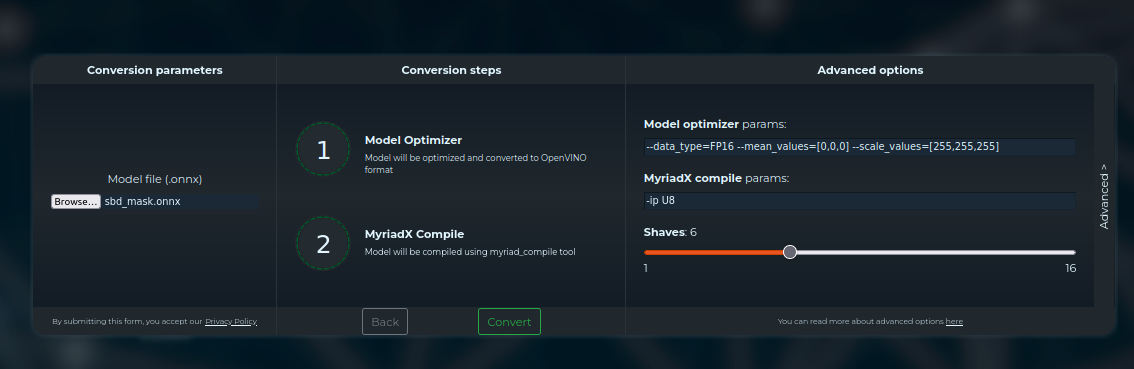
Arguments to convert/compile the SBD Mask classification model
Deploying the model
Now that we have .blob, we can start designing depthai pipeline. This will be a standard 2-stage pipeline:
Run 1st NN model; object detection model (face detection in our case)
Crop the high-resolution image to only get the image of the object (face)
Use cropped image to run the 2nd NN model; image recognition (SBD Mask classification model)
We already have quite a few 2-stage pipeline demos:
Age-gender recognition demo - First detect faces, then run age-gender recognition model
Emotion recognition demo - First detect faces, then run emotion recognition model
Face recognition demo - First detect faces, then run face recognition model (it also runs head pose estimation in between, documented here)
Person re-identification demo - First detect people, then run person re-id model
We will start with the age-gender recognition demo and simply replace the recognition model, so instead of running the age-gender model, we will run the SBD mask model.
Face detection
The age-gender demo uses face-detection-retail-0004 model, which is great in terms of accuracy/performance, so we will leave this part of the code: (lines 0-64)
Input shape
Age-gender uses age-gender-recognition-retail-0013 recognition model, which requires 62x62 frames. Our SBD-Mask model requires 224x224 as the input frame. You can see this when opening .xml/.onnx with the Netron app.
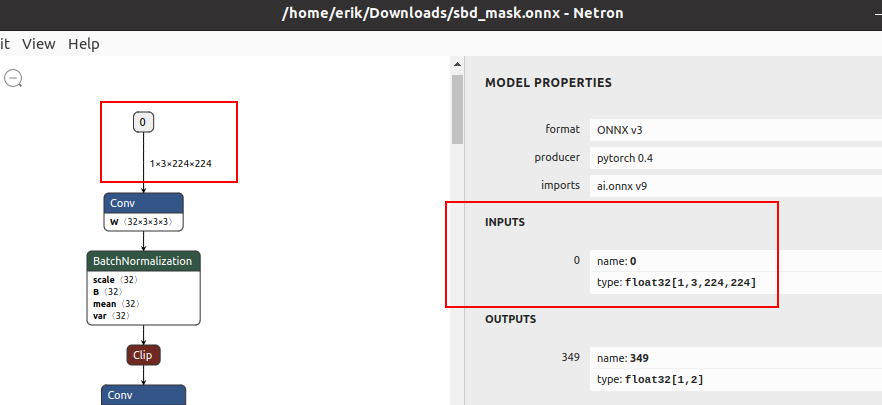
Input shape expected by the SBD Mask model
recognition_manip ImageManip node is responsible for cropping high-resolution frame to frames of faces at
the required shape. We will need to change 62x62 to 224x224 shape in Script node (line 116)
and as the ImageManip initial configuration (line 124).
    # Inside Script node
            for i, det in enumerate(face_dets.detections):
                cfg = ImageManipConfig()
                correct_bb(det)
                cfg.setCropRect(det.xmin, det.ymin, det.xmax, det.ymax)
                # node.warn(f"Sending {i + 1}. det. Seq {seq}. Det {det.xmin}, {det.ymin}, {det.xmax}, {det.ymax}")
-               cfg.setResize(62, 62)
+               cfg.setResize(224, 224)
                cfg.setKeepAspectRatio(False)
                node.io['manip_cfg'].send(cfg)
                node.io['manip_img'].send(img)
    """)
    cam.preview.link(image_manip_script.inputs['preview'])

    recognition_manip = pipeline.create(dai.node.ImageManip)
-   recognition_manip.initialConfig.setResize(62, 62)
+   recognition_manip.initialConfig.setResize(224, 224)
    recognition_manip.setWaitForConfigInput(True)
    image_manip_script.outputs['manip_cfg'].link(recognition_manip.inputConfig)
    image_manip_script.outputs['manip_img'].link(recognition_manip.inputImage)
The pipeline will now send 224x224 cropped frames of all detected faces to the recognition NN.
Change the model
Now that recognition_nn will get 224x224 frames, we have to change the recognition model to the SBD-Mask
model (line 132).
I have placed my sbd_mask.blob in the same folder as the main.py script.
    # Second stange recognition NN
    print("Creating recognition Neural Network...")
    recognition_nn = pipeline.create(dai.node.NeuralNetwork)
-   recognition_nn.setBlobPath(blobconverter.from_zoo(name="age-gender-recognition-retail-0013", shaves=6))
+   recognition_nn.setBlobPath("sbd_mask.blob") # Path to the .blob
    recognition_manip.out.link(recognition_nn.input)
Change decoding
The pipeline will stream SBD-Mask recognition results to the host. MultiMsgSync.py script will sync
these recognition results with high-resolution color frames and object detection results (to display the
bounding box around faces).
As mentioned above, SBD-Mask repository contained decoding logic as well, so
we can just use that. First we need to run log_softmax function and then np.argmax. I will be using
scipy’s log_softmax
function for simplicity. So we need to import from scipy.special import log_softmax in the script.
    bbox = frame_norm(frame, (detection.xmin, detection.ymin, detection.xmax, detection.ymax))

    # Decoding of recognition results
-   rec = recognitions[i]
-   age = int(float(np.squeeze(np.array(rec.getLayerFp16('age_conv3')))) * 100)
-   gender = np.squeeze(np.array(rec.getLayerFp16('prob')))
-   gender_str = "female" if gender[0] > gender[1] else "male"

+   rec = recognitions[i].getFirstLayerFp16() # Get NN results. Model only has 1 output layer
+   index = np.argmax(log_softmax(rec))
+   # Now that we have the classification result we can show it to the user
+   text = "No Mask"
+   color = (0,0,255) # Red
+   if index == 1:
+       text = "Mask"
+       color = (0,255,0)


    cv2.rectangle(frame, (bbox[0], bbox[1]), (bbox[2], bbox[3]), (10, 245, 10), 2)
    y = (bbox[1] + bbox[3]) // 2
Visualizing results
From the decoding step we got the text (“Mask”/”No Mask”) which we want to display to the user and color (green/red) which we will use to color the rectangle around the detected face.
    text = "No Mask"
    color = (0,0,255) # Red
    if index == 1:
        text = "Mask"
        color = (0,255,0)

-   cv2.rectangle(frame, (bbox[0], bbox[1]), (bbox[2], bbox[3]), (10, 245, 10), 2)
+   cv2.rectangle(frame, (bbox[0], bbox[1]), (bbox[2], bbox[3]), color, 3) # Colorize bounding box and make it thicker
    y = (bbox[1] + bbox[3]) // 2
-   cv2.putText(frame, str(age), (bbox[0], y), cv2.FONT_HERSHEY_TRIPLEX, 1.5, (0, 0, 0), 8)
-   cv2.putText(frame, str(age), (bbox[0], y), cv2.FONT_HERSHEY_TRIPLEX, 1.5, (255, 255, 255), 2)
-   cv2.putText(frame, gender_str, (bbox[0], y + 30), cv2.FONT_HERSHEY_TRIPLEX, 1.5, (0, 0, 0), 8)
-   cv2.putText(frame, gender_str, (bbox[0], y + 30), cv2.FONT_HERSHEY_TRIPLEX, 1.5, (255, 255, 255), 2)
+   cv2.putText(frame, text, (bbox[0], y + 30), cv2.FONT_HERSHEY_TRIPLEX, 1.5, (0, 0, 0), 8) # Display Mask/No Mask text
+   cv2.putText(frame, text, (bbox[0], y + 30), cv2.FONT_HERSHEY_TRIPLEX, 1.5, (255, 255, 255), 2)
    if stereo:
        # You could also get detection.spatialCoordinates.x and detection.spatialCoordinates.y coordinates
        coords = "Z: {:.2f} m".format(detection.spatialCoordinates.z/1000)
        cv2.putText(frame, coords, (bbox[0], y + 60), cv2.FONT_HERSHEY_TRIPLEX, 1, (0, 0, 0), 8)
        cv2.putText(frame, coords, (bbox[0], y + 60), cv2.FONT_HERSHEY_TRIPLEX, 1, (255, 255, 255), 2)
Changing color order
I noticed that the end result wasn’t very accurate. This can be a result of variety of things (model is just inaccurate,
model lost accuracy due to quantization (INT32->FP16), incorrect mean/scale values, etc.), but I like to first check color
order. ColorCamera node will output BGR color order by default (on preview output). The model’s accuracy won’t be best
if you send BGR frames to it and it was trained on RGB frames - which was the issue here.
You can change preview’s color order by adding this line:
    print("Creating Color Camera...")
    cam = pipeline.create(dai.node.ColorCamera)
    cam.setPreviewSize(1080, 1080)
    cam.setResolution(dai.ColorCameraProperties.SensorResolution.THE_1080_P)
    cam.setInterleaved(False)
    cam.setBoardSocket(dai.CameraBoardSocket.RGB)
+   cam.setColorOrder(dai.ColorCameraProperties.ColorOrder.RGB)
Note that the face detection model’s accuracy will decrease due to this change, as it expects BGR and will get RGB. The correct way would be to specify –reverse_input_channels (See Color order documentation) argument using the Model Optimizer, which is what was used to generate xml/bin files that were uploaded to our DepthAI Model Zoo.
mo --input_model sbd_mask.onnx --data_type=FP16 --mean_values=[0,0,0] --scale_values=[255,255,255] --reverse_input_channels
End result
You can view all changes we have made on Github here.
You might have noticed that face detection isn’t perfect when I have a mask on the face. That’s probably due to RGB/BGR issue mentioned above. It’s also likely the accuracy drops because the face-detection-retail-0004 model wasn’t trained on images that had faces covered with masks. The lighting on my face also wasn’t the best. We might get better results if we used ObjectTracker node to track faces, but that’s out of the scope of this tutorial.
2. QR code detector
This tutorial will focus around deploying the WeChat QR code detector. I found this model while going through OpenCV Model Zoo. There are 2 models in this folder:
detect_2021nov - QR code detection model
sr_2021nov - QR code super resolution (224x224 -> 447x447)
We will be focusing on the first one, the QR code detection model.
Converting QR code detector to OpenVINO
Compared to the previous model (SBD-Mask), I couldn’t find relevant information about mean/scale values for this model. For more information on mean/scale values, see the 1. tutorial. In such cases, I usually do the following:
Convert the model to OpenVINO (using model optimizer) without specifying mean/scale values
Use OpenVINO’s Inference Engine to run IR model (.bin/.xml)
After getting the decoding correct, I try out different mean/scale values until I fugire out the correct combination
After getting the decoding and mean/scale values right, I convert the model to blob and develop a DepthAI pipeline for it
So let’s first convert the model to IR format (xml/bin) using OpenVINO:
mo --input_model detect_2021nov.caffemodel
Now that we have xml/bin, we can also look at the input/output shape of the model using Netron.
Input shape is 1x384x384 (so grayscale frame, not color) and output shape is 100x7.
Using Inference Engine (IE) to evaluate the model
The code below was modified from our depthai-inference-engine. I personally like to evaluate the inference on the CPU first and get these values correct:
So I can estimate accuracy degradation due to quantization when going from CPU (INT32) to Myriad X (FP16).
from openvino.inference_engine import IECore
import cv2
import numpy as np

def crop_to_square(frame):
    height = frame.shape[0]
    width  = frame.shape[1]
    delta = int((width-height) / 2)
    return frame[0:height, delta:width-delta]

model_xml = 'detect_2021nov.xml'
model_bin = "detect_2021nov.bin"
shape = (384, 384) # We got this value from Netron

ie = IECore()
print("Available devices:", ie.available_devices)
net = ie.read_network(model=model_xml, weights=model_bin)
input_blob = next(iter(net.input_info))
# You can select device_name="MYRIAD" to run on Myriad X VPU
exec_net = ie.load_network(network=net, device_name='CPU')

MEAN = 127.5 # Also try: 127.5
SCALE = 255 # Also try: 0, 127.5

# Frames from webcam. Could take frames from OAK (running UVC pipeline)
# or from video file.
cam = cv2.VideoCapture(0)
cam.set(cv2.CAP_PROP_FPS, 30)
while True:
    ok, og_image = cam.read()
    if not ok: continue

    og_img = crop_to_square(og_image) # Crop to 1:1 aspect ratio
    og_img = cv2.resize(og_img, shape) # Downscale to 384x384
    image = cv2.cvtColor(og_img, cv2.COLOR_BGR2GRAY) # To grayscale
    image = (image - MEAN) / SCALE # Normalize the input frame
    image = image.astype(np.int32) # Change type

    output = exec_net.infer(inputs={input_blob: image}) # Do the NN inference
    print(output) # Print the output

    cv2.imshow('USB Camera', og_img)
    if cv2.waitKey(1) == ord('q'): break
Decoding QR code detector
The script above will print full NN output. If you have a QR code in front of the camera, the output array should contain
some values other than 0. The (100,7) output is the standard object detection output which contains:
batch_num = result[0] # Always 0, 1 frame at a time
label = result[1] # Always 1, as we only detect one object (QR code)
confidence = result[2]
bounding_box = result[3:7]
Initially, I thought we would need to perform NMS algorithm on the host, but after checking the model, I saw it has the DetectionOutput layer at the end. This layer performs NMS in the NN, so it’s done on the camera itself. When creating a pipeline with the DepthAI we will also be able to use MobileNetDetectionNetwork node, as it was designed to decode these standard SSD detection results.
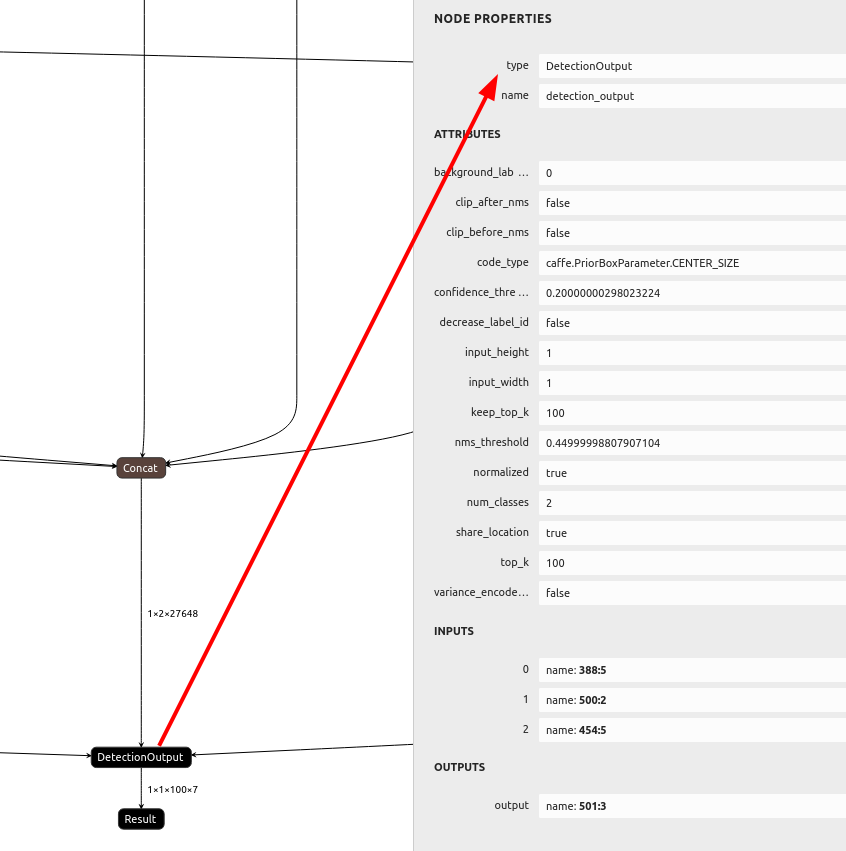
NMS layer in the model
# Normalize the bounding box to frame resolution.
# For example, [0.5, 0.5, 1, 1] bounding box on 300x300 frame
# should return [150, 150, 300, 300]
def frame_norm(frame, bbox):
    bbox[bbox < 0] = 0
    normVals = np.full(len(bbox), frame.shape[0])
    normVals[::2] = frame.shape[1]
    return (np.clip(np.array(bbox), 0, 1) * normVals).astype(int)

# ...

# Do the NN inference
output = exec_net.infer(inputs={input_blob: image})
print(output) # Print the output

results = output['detection_output'].reshape(100, 7)
for det in results:
    conf = det[2]
    bb = det[3:]
    bbox = frame_norm(og_img, bb)
    cv2.rectangle(og_img, (bbox[0], bbox[1]) , (bbox[2], bbox[3]), (255, 127, 0), 3)

cv2.imshow('USB Camera', og_img)
if cv2.waitKey(1) == ord('q'): break
After trying a few MEAN/SCALE values, I found that MEAN=0 and SCALE=255 works the best. We don’t need to worry about color order as the model requires grayscale images.
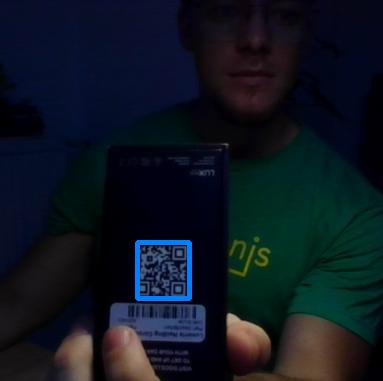
Success! Light blue bounding box around the QR code!
Testing accuracy degradation due to FP16 quantization
Now let’s try the model with FP16 precision instead of INT32. If you connect an OAK camera to your computer you can select
MYRIAD as the inference device instead of CPU. If the model works correctly with IE on Myriad X, it will work
with DepthAI as well.
- exec_net = ie.load_network(network=net, device_name='CPU')
+ exec_net = ie.load_network(network=net, device_name='MYRIAD')

  # ...
  image = cv2.cvtColor(og_img, cv2.COLOR_BGR2GRAY) # To grayscale
  image = (image - MEAN) / SCALE # Normalize the input frame
- image = image.astype(np.int32) # Change type
+ image = image.astype(np.float16) # Change type

  output = exec_net.infer(inputs={input_blob: image}) # Do the NN inference
I haven’t noticed any accuracy degradation loss, so we can use Model Optimizer and proceed with correct arguments this time. We will specify scale value 255 and FP16 datatype.
mo --input_model detect_2021nov.caffemodel --scale 255 --data_type FP16
Integrating QR code detector into DepthAI
We now have our normalized model in IR. I will use blobconverter app to convert it to .blob, which is required
by the DepthAI.
As mentioned above, the model outputs the standard SSD detection results, so we can use MobileNetDetectionNetwork node.
I will start with Mono & MobilenetSSD example
code and only change blob path, label map, and frame shape.
import cv2
import depthai as dai
import numpy as np

nnPath = "detect_2021nov.blob" # Change blob path
labelMap = ["background", "QR-Code"] # Change labelMap

# Create pipeline
pipeline = dai.Pipeline()

# Define sources and outputs
monoRight = pipeline.create(dai.node.MonoCamera)
manip = pipeline.create(dai.node.ImageManip)
nn = pipeline.create(dai.node.MobileNetDetectionNetwork)
manipOut = pipeline.create(dai.node.XLinkOut)
nnOut = pipeline.create(dai.node.XLinkOut)

manipOut.setStreamName("right")
nnOut.setStreamName("nn")

# Properties
monoRight.setBoardSocket(dai.CameraBoardSocket.RIGHT)
monoRight.setResolution(dai.MonoCameraProperties.SensorResolution.THE_720_P)

manip.initialConfig.setResize(384, 384) # Input frame shape
manip.initialConfig.setFrameType(dai.ImgFrame.Type.GRAY8) # Model expects Grayscale image

nn.setConfidenceThreshold(0.5)
nn.setBlobPath(nnPath)
nn.input.setBlocking(False)

monoRight.out.link(manip.inputImage)
manip.out.link(nn.input)
manip.out.link(manipOut.input)
nn.out.link(nnOut.input)

with dai.Device(pipeline) as device:

    qRight = device.getOutputQueue("right", maxSize=4, blocking=False)
    qDet = device.getOutputQueue("nn", maxSize=4, blocking=False)

    frame = None
    detections = []

    def frameNorm(frame, bbox):
        normVals = np.full(len(bbox), frame.shape[0])
        normVals[::2] = frame.shape[1]
        return (np.clip(np.array(bbox), 0, 1) * normVals).astype(int)

    def displayFrame(name, frame):
        color = (255, 255, 0)
        for detection in detections:
            bbox = frameNorm(frame, (detection.xmin, detection.ymin, detection.xmax, detection.ymax))
            cv2.putText(frame, labelMap[detection.label], (bbox[0] + 10, bbox[1] + 20), cv2.FONT_HERSHEY_TRIPLEX, 0.5, color)
            cv2.putText(frame, f"{int(detection.confidence * 100)}%", (bbox[0] + 10, bbox[1] + 40), cv2.FONT_HERSHEY_TRIPLEX, 0.5, color)
            cv2.rectangle(frame, (bbox[0], bbox[1]), (bbox[2], bbox[3]), color, 2)
        cv2.imshow(name, frame)

    while True:
        frame = qRight.get().getCvFrame()
        frame =  cv2.cvtColor(frame, cv2.COLOR_GRAY2BGR) # For colored visualization
        detections = inDet = qDet.get().detections
        displayFrame("right", frame)

        if cv2.waitKey(1) == ord('q'):
            break
QR Code end result
This is the end result of the script above. You can see that the mono camera sensor on OAK cameras performs much better in low-light environment compared to my laptop camera (screenshot above). I uploaded this demo to depthai-experiments/gen2-qr-code-scanner where I have also added blobconvewrter and displaying NN results on high-resolution frames.
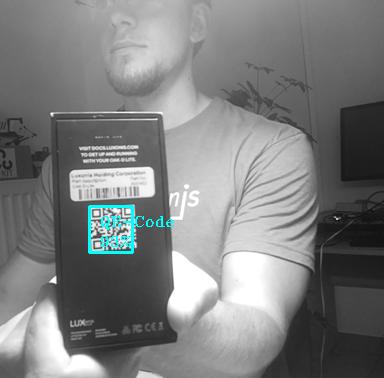
On-device decoding using the script above!